Using git
git is a version control system ("VC") developed by Linus Torvalds specifically to help manage the development of his operating system kernel, Linux. VC is a fundamental function of modern management. For example, you probably have noticed that most courses in Shako have two or more catalog numbers. For example, Math for Shako is both 0AL0100 (for recent entrants) and 01CN101 (for older entrants, 2019 and before). The reason for this is that requirements for graduation have changed slightly with the change in academic organization (01CN101 was required for all 60+ M1 students, while 0AL0100 seems to have less than 30 registered). In order to keep these requirements separate, (1) you want multiple versions of the requirements document active at the same time, and (2) it's useful to have different course numbering (eg, so participant eligibility requirements can be brief and unconditional in the catalog).
The first use for VC is to help in managing these situations, by recording each new version (committing to a repository of versions).
A second use for VC is measuring progress. VC applications always provide a facility for enumerating differences from one version to the next (usually called diff). By checking the quantity of changes in lines added, subtracted, and changed, you get a measure of how much work has been done. By looking at the specific changes, you see what work has been done. Also, each version can be associated with a comment, or log, summarizing the changes in the version. (Unfortunately, diff only works properly on "plain text". It's not useful for Word and Excel files, but it's great for LaTeX and CSV, and of course for source programs.)
Originally VC served mainly the purposes of keeping multiple versions easily accessible at the same time and of comparing versions. With the improvement of networks, VC applications acquired a third use: communication. That is the ability to send both changes (pushing your changes to your colleague's repository or pulling her changes from hers) and whole repositories (cloning) to teammates. This makes it easy for colleagues to share new content with each other. This is the feature that I most want to use in our zemi.
In fact, it has become common that members of a team will work on the same content at the same time, thus creating branches that have different histories, and frequently creating conflicts that must be resolved by merging the branches. Although this may sound complex, VC systems provide tools to assist with merging, and frequently can accomplish a merge entirely automatically. (This doesn't mean the automatic merge generates consistent content, unfortunately, but merges made by humans are just as likely to be inconsistent.)
A special case of communication is off-site backup. It is very frequently the case that a team will keep one or more shared repositories on a server, as well as each member having personal mirror repositories on their own workstation. The shared repository then is an "off-site backup" of the member's repository, making it easy to recover the most recent version (as well as all the historical versions) after a disk crash or loss of the personal workstation.
Initializing your workspace
Creation of a shared repository on a server is usually done by the server's administrator (that's me). (On sophisticated systems like GitHub and GitLab, it's possible for ordinary users to create repositories, but that's not possible on my host.) Because I will create an empty shared repository for you, you just push your first version after initializing your personal respository.
Requirements for using git
- SSH. SSH is the "secure shell", which creates an encrypted channel (like HTTPS, encrypted web connections) that git can use, and automatically logs in using the same private encryption key. On Mac, the Terminal application provides SSH services. I'm not sure about Windows.
- An SSH key pair. To use SSH, you must have a matched pair including a public key and a private key. Most encryption systems are symmetric, they use the same key for encryption and decryption. But in asymmetric encryption (usually called "public key encryption") you can use either key for encryption, but the other one must be used for decryption. As long as you never tell anyone your private key, you can tell your public key to the world.
- Choose a user name (romaji) for my host. It doesn't need to be your name, but you probably don't want it to be too crazy because some day the repository might become public. It probably could be any language, but I'm not sure and I'd rather avoid complications.
- Git. Git is the VC system used by the majority of software projects. On Mac git is provided by the Xcode integrated development environment (IDE).
- Send me your preferred user name and your public key file.
I use the OpenSSH command line tools, but I think it's likely most students will use something else so I can't be very helpful without knowing what tool it is.
I think both git and OpenSSH, as well as some other applications (like GUIs for git) are available from the Anaconda distribution (available for all common operating systems).
More about SSH and OpenSSH
There are two ways to use asymmetric encryption:
- You encrypt something with your private key. Then anyone can read it by using the public key, but it proves that you sent it, because nobody else has the private key that allows decryption using the public key to return ungarbled text. This is how digital signatures work, and why you can use your private key to log in if the host knows your public key.
- Someone encrypts something with your public key. Then it becomes a secret message only you can read.
SSH is not useful for these generic cases, for example in secure email. It is optimized for encrypted streaming communication and logging in to such a session. Instead, the most popular open source software for these operations is gpg2, the GNU Privacy Guard (version 2). But you don't need GPG for our repositories.
Once you have installed OpenSSH, there are three applications you need to use. The main application, ssh, just needs to be on your PATH so git can find it. Otherwise, you probably don't need to use it, git does all the work.
The second is ssh-keygen, which you need to run once to generate your key pair. It is safe to accept all the defaults, except for the passphrase. Your passphrase should be long (mine is 43 keystrokes), use a mixture of letters, digits, and symbols, and be otherwise hard to guess even if someone knows you. I don't recommend using kanji, kana, or accented Latin letters but they would probably work. I do recommend randomly mixing languages (ie, using romaji or pinyin to include Japanese or Chinese).
The third application is ssh-agent. You can use ssh-agent add PRIVATE-KEY-FILE, then give your passphrase. After that, ssh will check to see if you have logged in to the agent for that key, and if so, you don't need to enter your passphrase again. If you don't git push or git pull very often, this isn't much of a saving, but most people stay logged in to their workstations for weeks at a time, so this saves you the annoyance of entering the passphrase once a day or so, and the much bigger annoyance of entering it several times if your push command doesn't work and you're not sure why it fails.
If you use a different application to provide SSH services, you probably will have different application names, and user-friendly implementations may automatically help you to create a key pair if you don't have one, and ask if you want to start an agent the first time you try to use SSH.
Initializing your repository and workspace
In git (and most other modern VC systems) your repository and workspace for a project are normally both contained in one folder, which may contain more folders that are managed by git. All versions of all of these folders and their contents are stored in the one repository in the root folder.
If all of your thesis content that you want to manage with git are contained in one folder already, go to step 2. Otherwise, make a folder to be your repository, and move (not copy) the files you want managed by git there. You can put other files there too, and teach git to ignore them. But it's important that (a) your project files are all in one folder or its subfolders, and (b) there are no other copies of those files outside the repository (to avoid working on a file that isn't managed by git which can be very embarrassing).
Use a terminal window to enter the root folder. Type git init.
Make a plain text file called README.md in the root folder. It doesn't matter what's in it, but usually it is a description of your research project. It can be one line for now.
Type git add README.md, then git commit -m "Add README.". You now have your first commit!
It's important that this first commit be trivial like this, because it allows us to do some useful things with branches later. This allows you to not carefully plan everything right now.
Type git push --set-upstream gitolite@turnbull.sk.tsukuba.ac.jp:zemi/USER :, where USER is the user name you chose.
Once this succeeds you can go on to item 6. Note you only use --set-upstream once, to link your personal repository to the shared repository on my host.
Move the current versions of the most important files to the root folder if they're not already there. These include
- your annotated bibliography (Excel or Open Document spreadsheet).
- your most recent presentation slides
- your most recent version of your research proposal (may be very old)
- your most recent editable drafts (Word, LaTex, etc.) of parts of your thesis
- any other important documents (for example, draft questionnaires).
Use git add ... to register all these files. Then use git commit -m "Current version as of 2022/08/10." to commit them.
Use git push (note! no --set-upstream, no host!) to send those files to the shared repository.
Now you're done with the initial setup.
We can handle any problems in individual sessions.
The basic VC workflow
- Edit document in VC workspace until it's working again (eg, compiles without error for software, or no spellcheck errors for text).
- Commit to the local VC branch.
- If ready for comment, go to 4, otherwise go to 1.
- Push to the shared repository.
- If ready for submission, DONE, otherwise go to 1.
In VC systems, repository, branch, and workspace have different roles. The repository is the collection of all content of all versions of all files in the project, along with metadata including configuration data, commits, commit logs, tags, and branches. A branch is an ordered sequence of commits, where the system can use any commit to reconstruct a specific version of the whole project. A workspace is a folder containing the files (and subfolders) which you edit.
Commits bind all of these concepts together. A commit records the full state of the workspace at the time of the commit, along with certain metadata, such as the date and time of the commit and the parent commit. A branch is a sequence of commits, ordered by the chain of parents. And the repository contains all of this data.
In git, the repository is always in a folder named PROJECT/.git or PROJECT.git. In the former form, the PROJECT folder is the workspace. In the latter form, there is no workspace, and the repository is said to be bare. The .git folder is just an ordinary folder with certain files in it: you can look in it. Except for the config file, you shouldn't change anything. Even the config file can mostly be handled by git commands, and you don't need to touch it.
The other special file in git you should know about is the .gitignore file. This file is in the same directory as the .git folder (i.e., it is PROJECT/.gitignore). You can add file name patterns (called globs) such as *.pdf to match files that normally should not be recorded by git. This is most useful when your editing file format is .tex or .docx, but you make PDF files for distribution or presentation. If you put *.pdf in .gitignore, git status will not show those files as "waiting to be added", and git add will refuse to record them. (You can force git to do those things, but it's rare that you want to, so .gitignore can really reduce the clutter in git's status messages.)
Adding history and reducing version clutter
I suspect that most students have several versions of their important documents, often with names indicating dates or versions. Here is an example of how to get started quickly by adding the current version, and then cleaning up old versions by adding them on a branch under a generic name (i.e., a common name without a version indicator).
Although the example worked in detail below involves only versions of one file, the same procedure works pretty much the same way with multiple versioned files at the same time. Let's outline the strategy using a situation that's more realistic for students. For example, you might have these old versions of your bibliography and presentation slides:
2021-08-15 bibliography.xlsx
2022-06-15 bibliography-2022.06.15.xlsx
2020-01-05 bibliography-notes.xlsx
2020-01-31 nyuushi-plan.pptx
2022-07-10 presentation-summer.pptx
2021-02-15 proposal.pptx
where the list is sorted alphabetically by name. (In case you're wondering, yes, many students have versions but not very systematic naming. That's OK, but I think it's better to use simple generic names and git!) First, we choose the naming scheme:
.xlsx -> bibliography.xlsx
.pptx -> THEME.pptx
where "bibliography" is literal, and "THEME" is a word or two that reminds you of your research theme. Note that if your theme has changed, you need to consider whether you should give each theme its own generic name. If the content is similar (motivation, previous research) but the particular research question has changed, I'd give them the same name. If everything is different, the before change group and the after change group should go to different file names.
Now we sort according to date:
2020-01-05 bibliography-notes.xlsx
2020-01-31 nyuushi-plan.pptx
2021-02-15 proposal.pptx
2021-08-15 bibliography.xlsx
2022-06-15 bibliography-2022.06.15.xlsx
2022-07-10 presentation-summer.pptx
and execute the plan:
create a README, add, and commit
(any "real work" that need to be done first [#]_)
create and checkout the add-old branch
Because bibliography.xlsx is not the earliest of the bibliography versions, we need to rename it:
rename bibliography.xlsx -> bibliography-tmp.xlsx
Now we continue with the basic plan:
rename bibliography-notes.xlsx -> bibliography.xlsx, add and commit
rename nyuushi-plan.pptx -> THEME.pptx, add and commit
rename proposal.pptx -> THEME.pptx, add and commit
rename bibliography-tmp.xlsx -> bibliography.xlsx, add and commit
rename bibliography-2022.06.15.xlsx -> bibliography.xlsx, add and commit
rename presentation-summer.pptx -> THEME.pptx, add and commit
Finally:
graft "real work" branch on the end of add-old branch
git mv current versions to corresponding generic names and commit
You want to use git mv here because it will keep track of the deletion of the current version, the renaming to the generic name, and the addition of the changes to git's to-do list. If you just do an ordinary rename, it's easy to forget something (especially the delete part).
To keep the example below from getting even longer, we just work with three old versions of one file. The important things about this cleanup work is (1) you can safely (that is, without losing easy access to the old content) delete the old versions from your workspace and (2) during the process you only need to be concerned with one file at a time. This makes the work go fairly quickly. I'm pretty sure I could have done all the work below in about 15 minutes. (In fact, it took about 6 hours because I was writing this document as I went along, and taking screen shots in gitk at the same time, and then had to do it again because all the screen shots had the dock obscuring important parts of the gitk window.) I'm not sure in a real cleanup I would have used gitk at all, because it's that straightforward.)
A real example
These files are together in a particular folder. They were created on 2020-03-15 at the times listed:
% for i in *.txt; do stat -f '%Sm %N' -t %T $i; done
03:07:51     myports.txt
14:55:56     myports1.txt
15:01:28     myports2.txt
15:01:36     myports3.txt
We start by creating a file that is independent of the files we want to manage. The .md extension indicates that they are in Markdown format, which is a plaintext markup language used on many websites for convenient creation of formatted pages. There are many tutorials on Markdown on the web, and it's pretty easy to use. We're just going to use plain text with no markup in it, but this allows you to do things like make headers and use different faces (italic and bold for emphasis) later.
echo is a Unix command that simply prints the text it's given, and the > README.md part redirects the printed output to that file, overwriting any exiting file. cat is a Unix command that prints out the contents of one or more files. You can just use an editor such as nano or even Word as long as you remember to save as plain text.
% echo "This is a meaningless README so I can make a root commit." > README.md

% cat README.md
This is a meaningless README so I can make a root commit.
Next we initialize the git repository in the same folder. It creates a subfolder called .git, and puts its metadata in it. You won't be able to see this folder using macOS's Finder or Windows' Explorer, and you should never touch anything in it until you become fairly expert.
% git init
Initialized empty Git repository in /Users/steve/myports/.git/

% ls .git
COMMIT_EDITMSG  REBASE_HEAD     gitk.cache  info        packed-refs
HEAD            config          hooks       logs        refs
ORIG_HEAD       description     index       objects
Now we add a file:
% git add README.md


% git commit -m "Trivial commit to establish a useful root."
[main (root-commit) b67f416] Trivial commit to establish a useful root.
 1 file changed, 1 insertion(+)
 create mode 100644 README.md
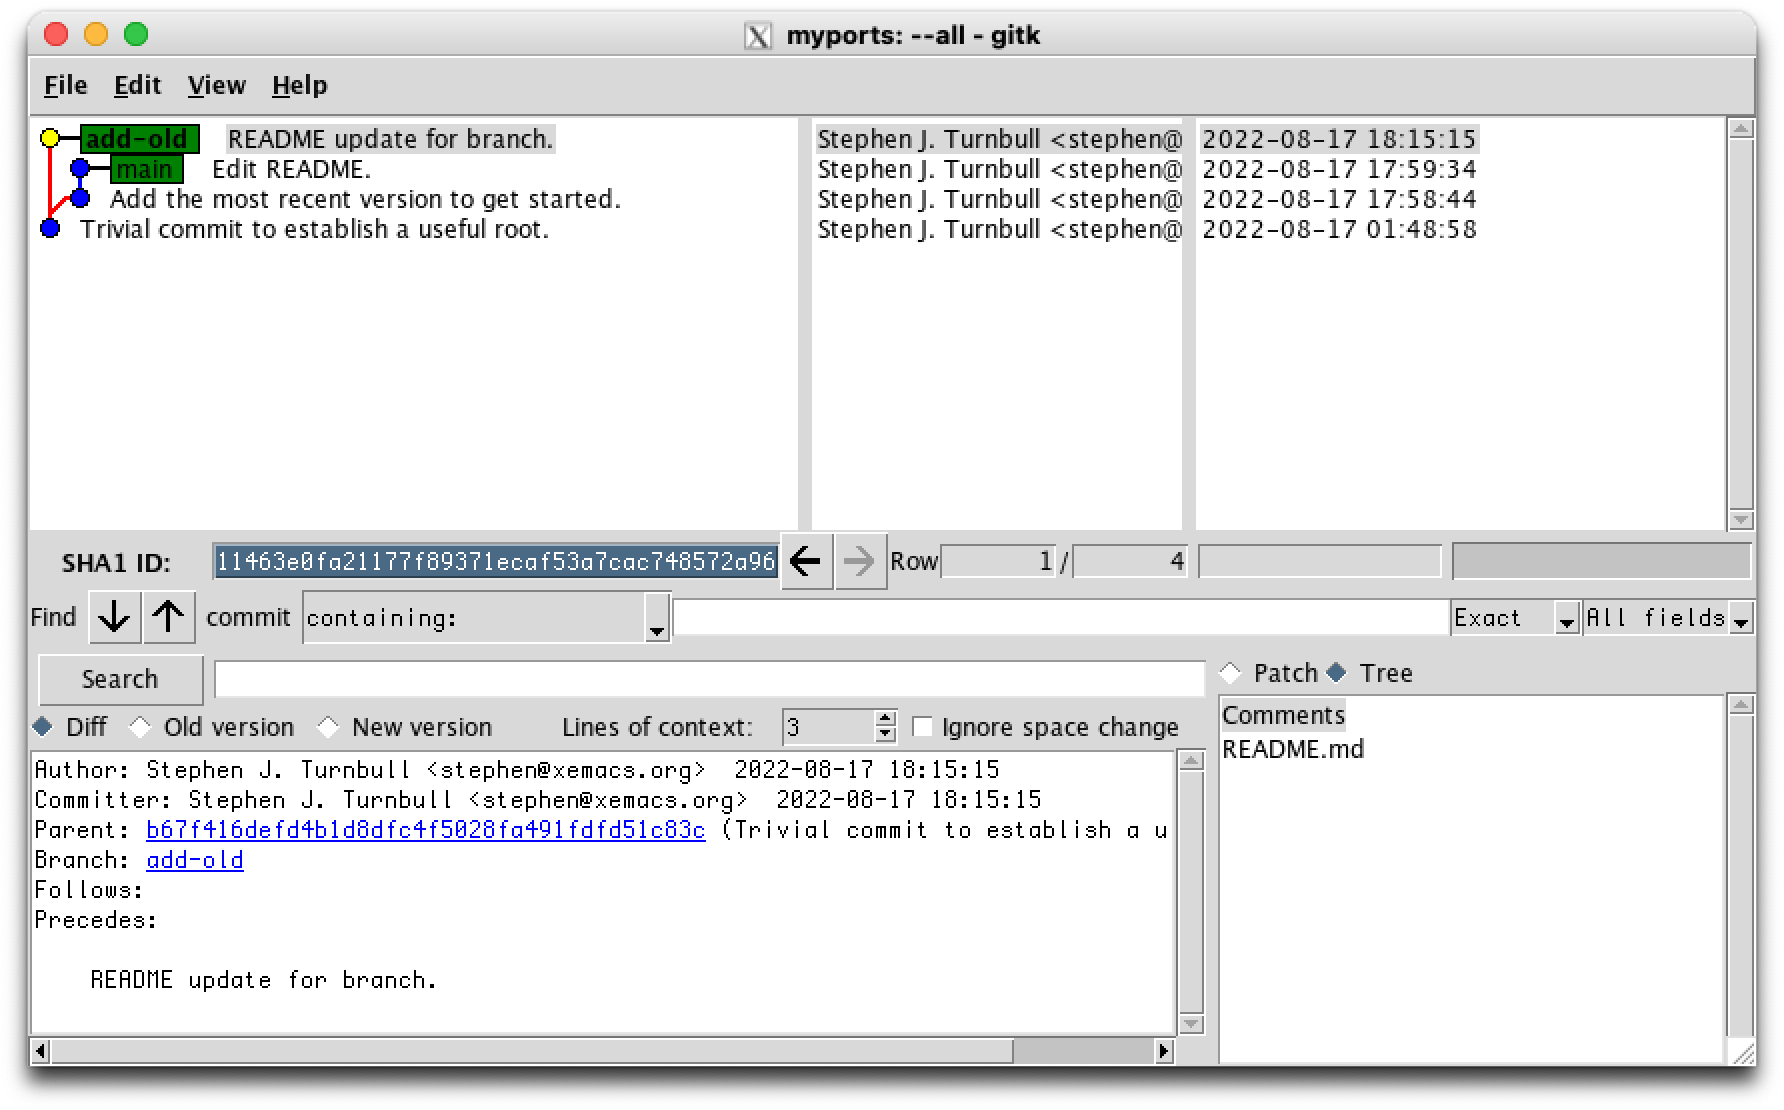
Next, use gitk to examine the structure of the repository. gitk presents a lot of information in many panes within its window, but there are a few we're especially interested in. The option --all tells gitk to display all named refs (branches and tags) in the repository, as well as their ancestors.
% gitk --all &
[1] 18395
The top left pane displays the repository structure as a graph. At present it's not very interesting, with only one node and no edges. The node (circle) is colored yellow to indicate the HEAD commit, which is the place where new commits will be added. The green rectangle tells us that this is the main branch (if you have an older version of git it might be master instead). You also see a very abbreviated part of the log message, which is highlighted with a grey background to show that information in the lower part of the window relates to this commit (we call this commit the focus commit, to distinguish it from the HEAD).
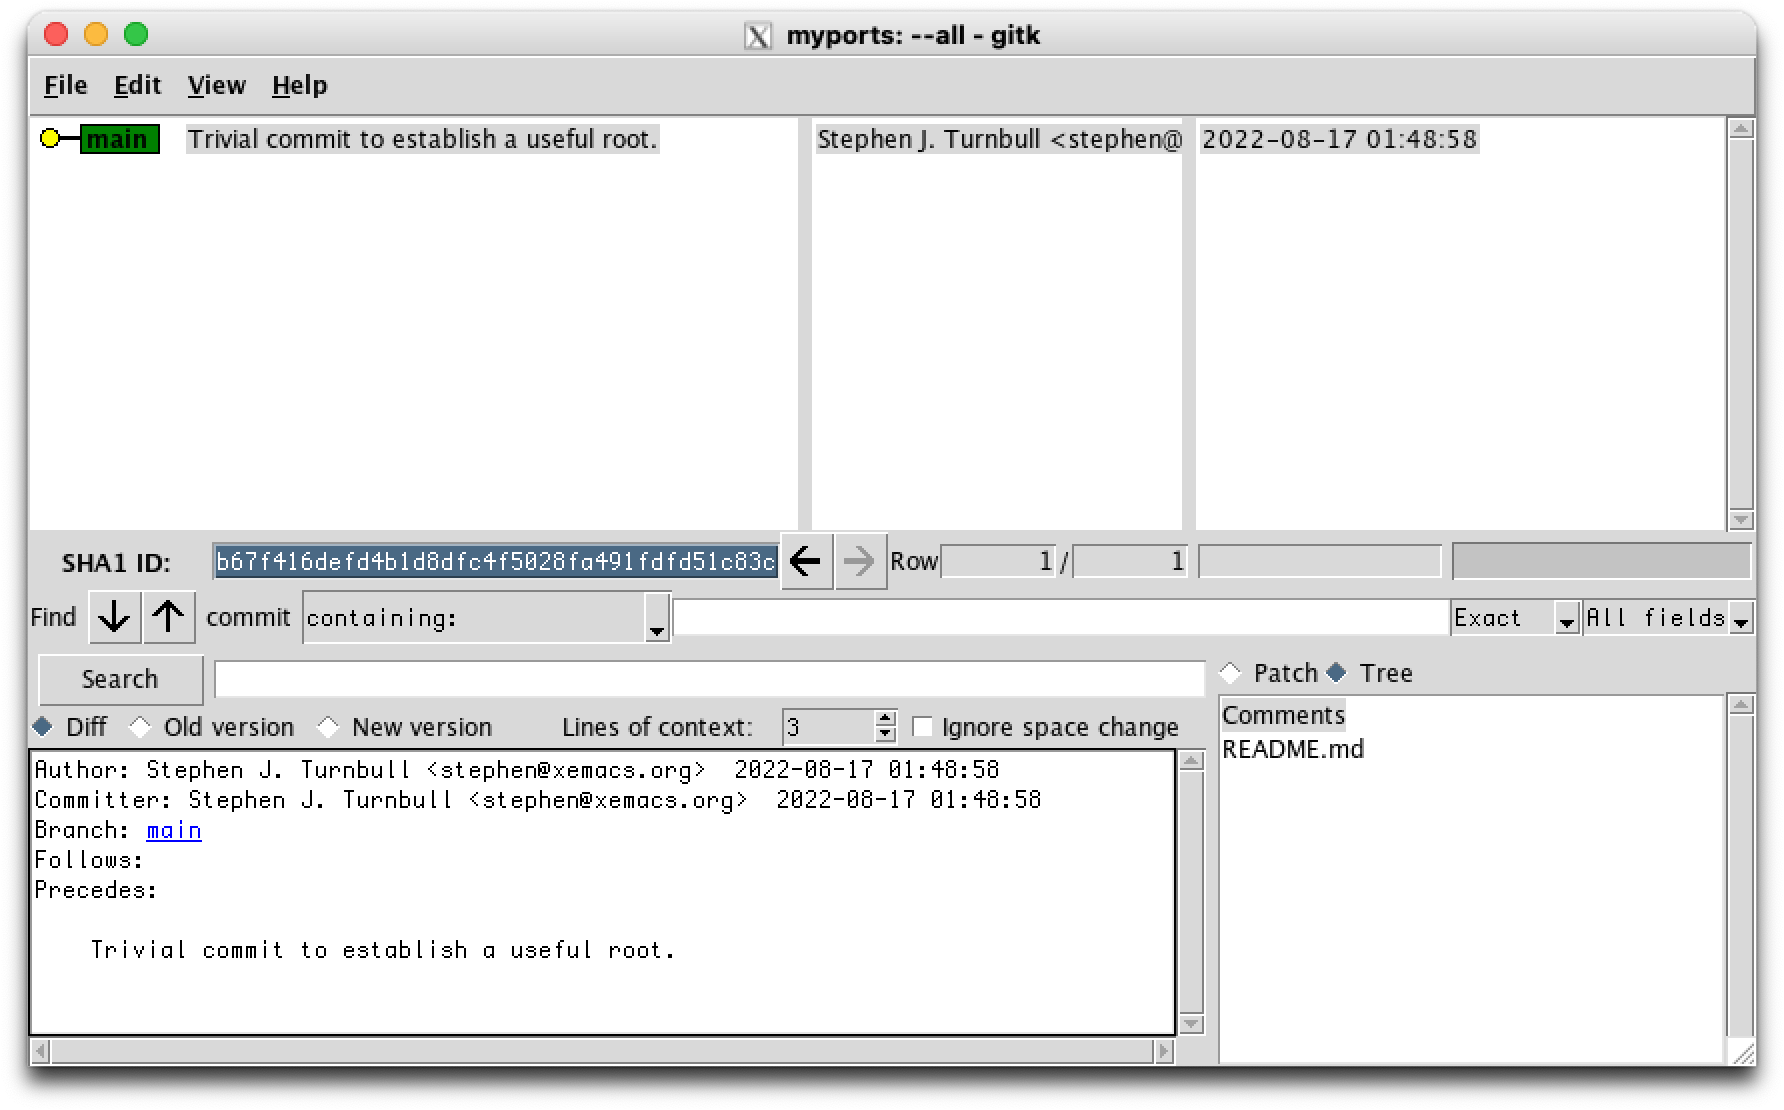
The center and left panes show the author and timestamp of the commit.
At the lower left is the full log message for the focus commit, and at the lower right, you see the list of files that git is currently tracking as of the focus commit.
We see that git only tracks one file, although it sees the files we want to track:
% git ls-files
README.md

% git status
On branch main
Untracked files:
  (use "git add <file>..." to include in what will be committed)
    myports.txt
    myports1.txt
    myports2.txt
    myports3.txt

nothing added to commit but untracked files present (use "git add" to track)
Note that the "true" root, the parent of our commit, is invisible in gitk. This is true of git itself. This is why we create a trivial commit to provide a beginning to the graph of commits. Let's go ahead and get ready for some real work by adding myports3.txt, which is the current (most recent version), and committing that change to our repo.
% git add myports3.txt

% git status
On branch main
Changes to be committed:
  (use "git restore --staged <file>..." to unstage)
    new file:   myports3.txt

Untracked files:
  (use "git add <file>..." to include in what will be committed)
    myports.txt
    myports1.txt
    myports2.txt

% git commit -m "Add the most recent version to get started."
[main 9a863db] Add the most recent version to get started.
 1 file changed, 1167 insertions(+)
 create mode 100644 myports3.txt
Now we can go to work. The content of the "myports" files is system administrivia, so instead of working on myports3.txt, we'll do a little more work on README.md, and commit it. But if this was your bibliography, you might was to work on that right away. You could do that exactly as we do in this example.
% echo "Edit the README to add history." >> README.md

% git status
On branch main
Changes not staged for commit:
  (use "git add <file>..." to update what will be committed)
  (use "git restore <file>..." to discard changes in working directory)
    modified:   README.md

Untracked files:
  (use "git add <file>..." to include in what will be committed)
    myports.txt
    myports1.txt
    myports2.txt

no changes added to commit (use "git add" and/or "git commit -a")
Instead of using git add, we tell git commit the name of the file we want to commit. For a file that is being tracked by git, that is, it has already been added to the repository, these two are equivalent. You can do it either way.
There are two situations where you must use git add. The first you've already seen: when the file is not yet tracked. We'll meet the other later.
% git commit -m "Edit README." README.md
[main 07bfafd] Edit README.
 1 file changed, 1 insertion(+)

% git ls-files
README.md
myports3.txt

% git status
On branch main
Untracked files:
  (use "git add <file>..." to include in what will be committed)
    myports.txt
    myports1.txt
    myports2.txt

nothing added to commit but untracked files present (use "git add" to track)
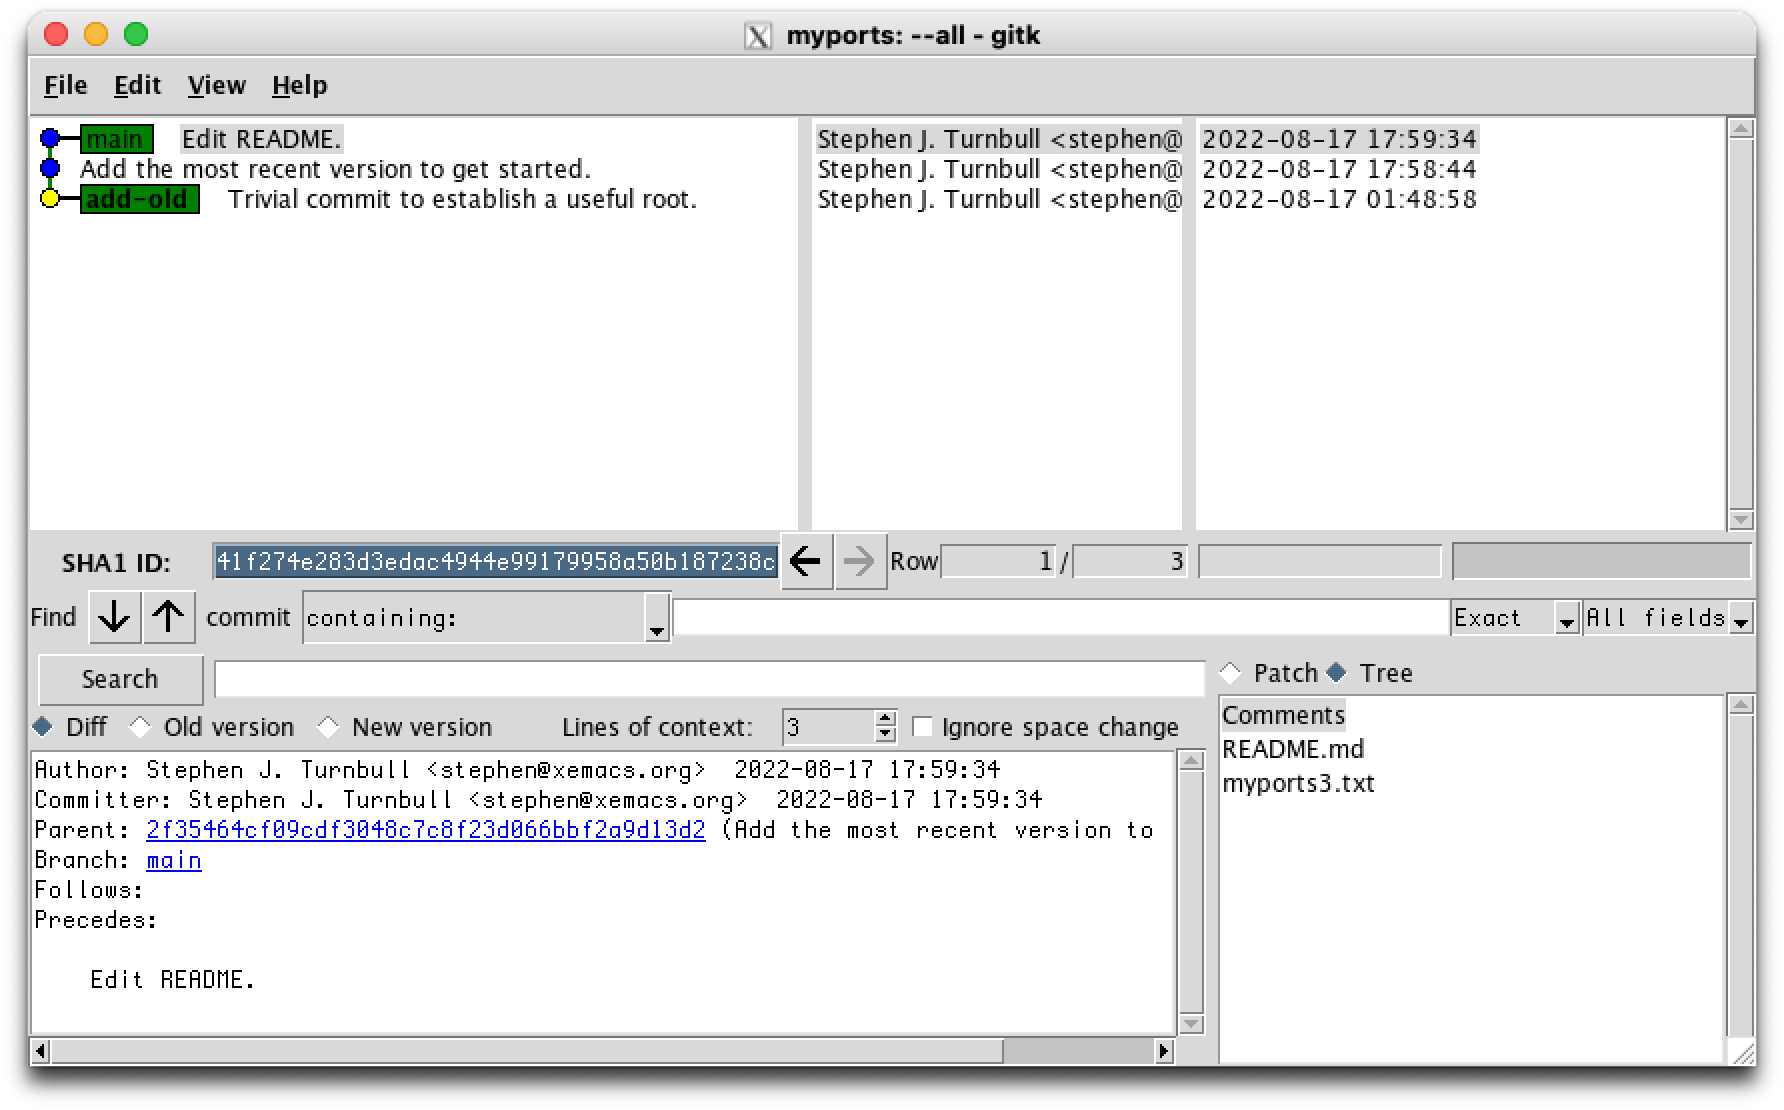
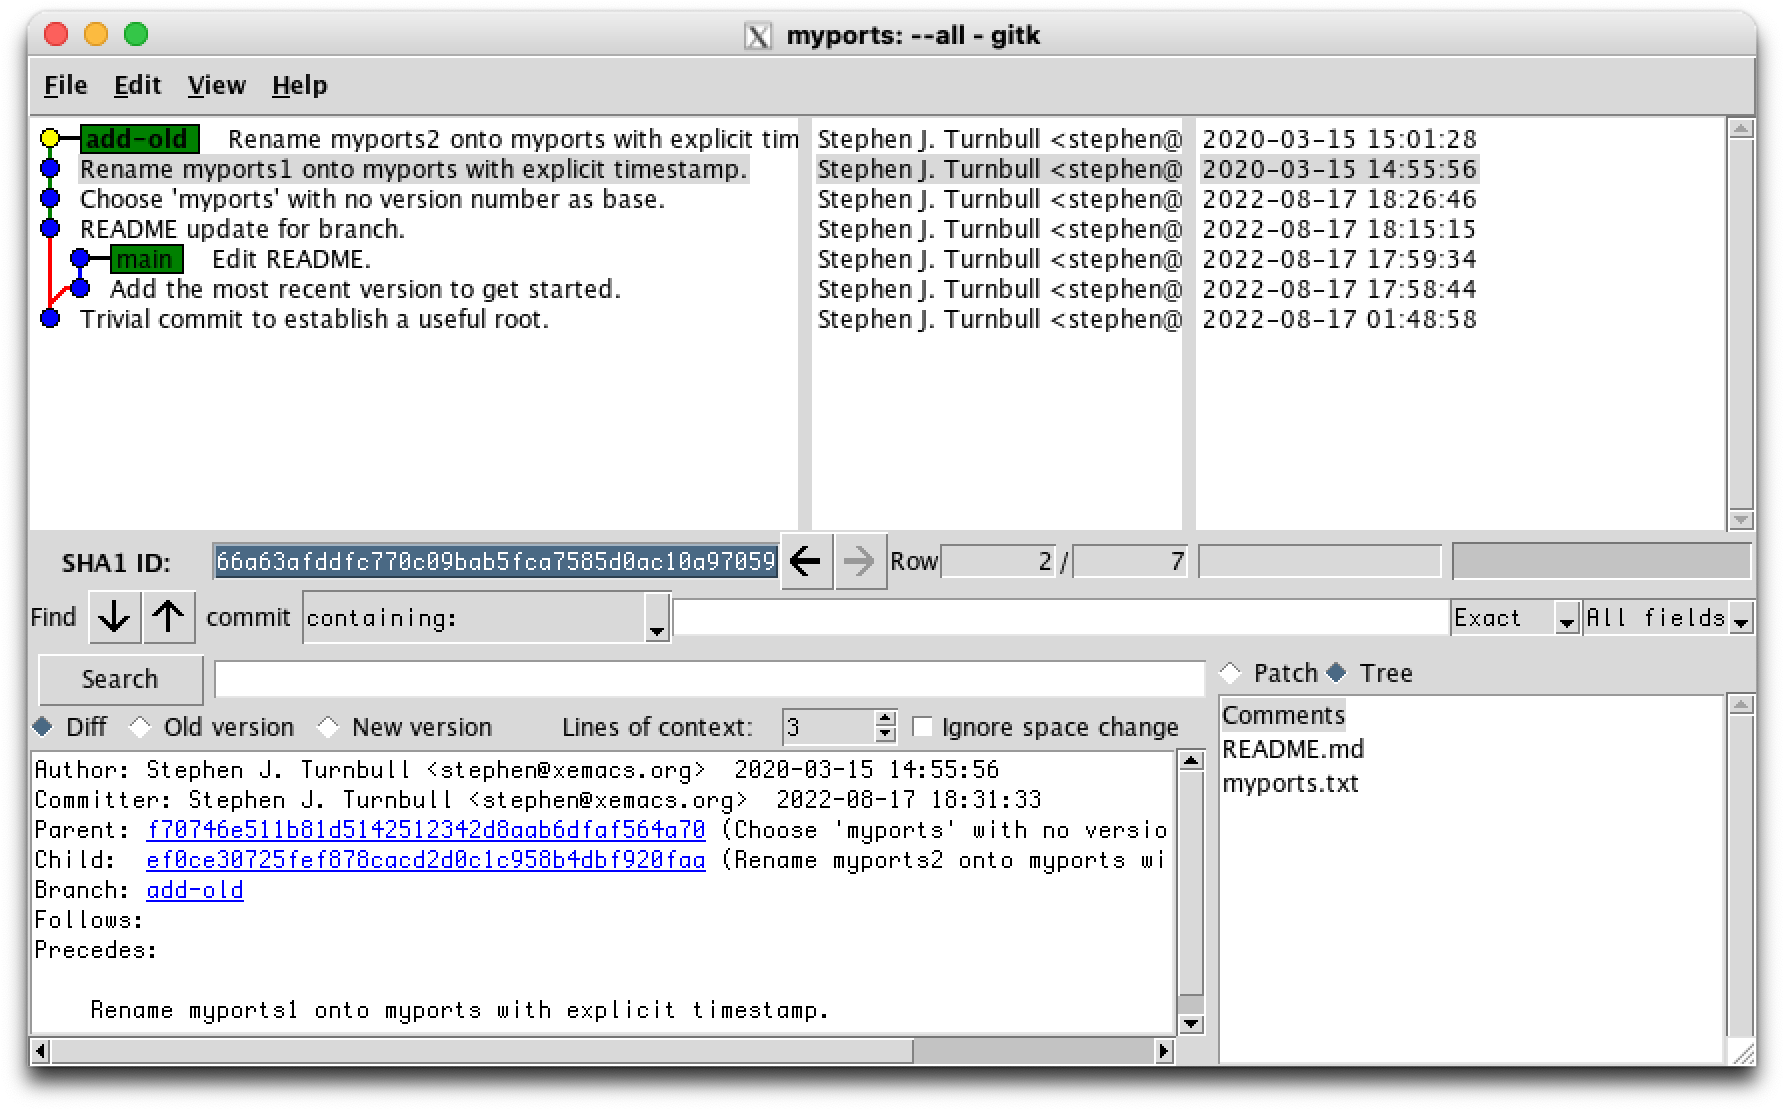
Now we have a non-trivial history:

We have some free time (or maybe we ran out of ideas for both README.md and myports3.txt). We'd like to clean up the folder without losing the old versions. We'd also like those versions to be part of the branch in the same order that they were created: myports.txt oldest (at the bottom of the branch in gitk), then myports1.txt, myports2.txt, and finally myports3.txt in that order going up the tree. Finally, we'd like them all to be called myports.txt, since the version numbers don't help us remember what changes we made.
It's possible to "unroll" a branch, and then re-add the commits later, using the git diff command and the system patch command, but only if you're working with text files. Also, it's very tedious and mistake prone.
So we make a separate branch. git checkout BRANCH switches to BRANCH. However, to guard against creating a branch with a typo, the named ref BRANCH must already exist. If you want to create a new branch, use the -b flag. The first argument add-old is the branch to switch to, and the second is where to attach the new branch, in this case the second ancestor ("grandparent") of HEAD. There is another notation used for the first ancestor (parent) of HEAD, which is HEAD^.
You can see that the add-old branch has already become head, because it is yellow, and the node for main is now blue. This branch already has some commits in it. The way git treats a branch is that it follows the parent relation back to the root. So the commit labeled "Trivial commit to establish a useful root." is the ancestor of all future commits on this branch. Suppose this commit didn't exist. Then the only place to attach our branch for building ancient history would be the commit labeled "Add the most recent version to get started." But that commit already contains the current version of myports.txt, which is myports3.txt. Then any "ancient" versions would appear to come after the current version. We'll see later that branches can be "cut off and grafted somewhere else", but no matter what you cut, where you cut, and where you graft in this situation (where "Trivial commit" doesn't exist), you will find that myports3.txt already exists in an ancestor of any commit we now add to the branch add-old.
Because we have our "Trivial commit", we can add the ancient versions in order up to the most recent, then cut off the main branch, and graft it on top of the add-old branch.
So let's start constructing our ancient versions branch. First we explain what we're doing in README.md:
% echo "Now let's make a branch to clean up old versions in order." >> README.md

% echo "Show GIT_AUTHOR_DATE format." >> README.md

% stat -t %FT%T -f %Sm myports.txt | tee -a README.md
2020-03-15T03:07:51
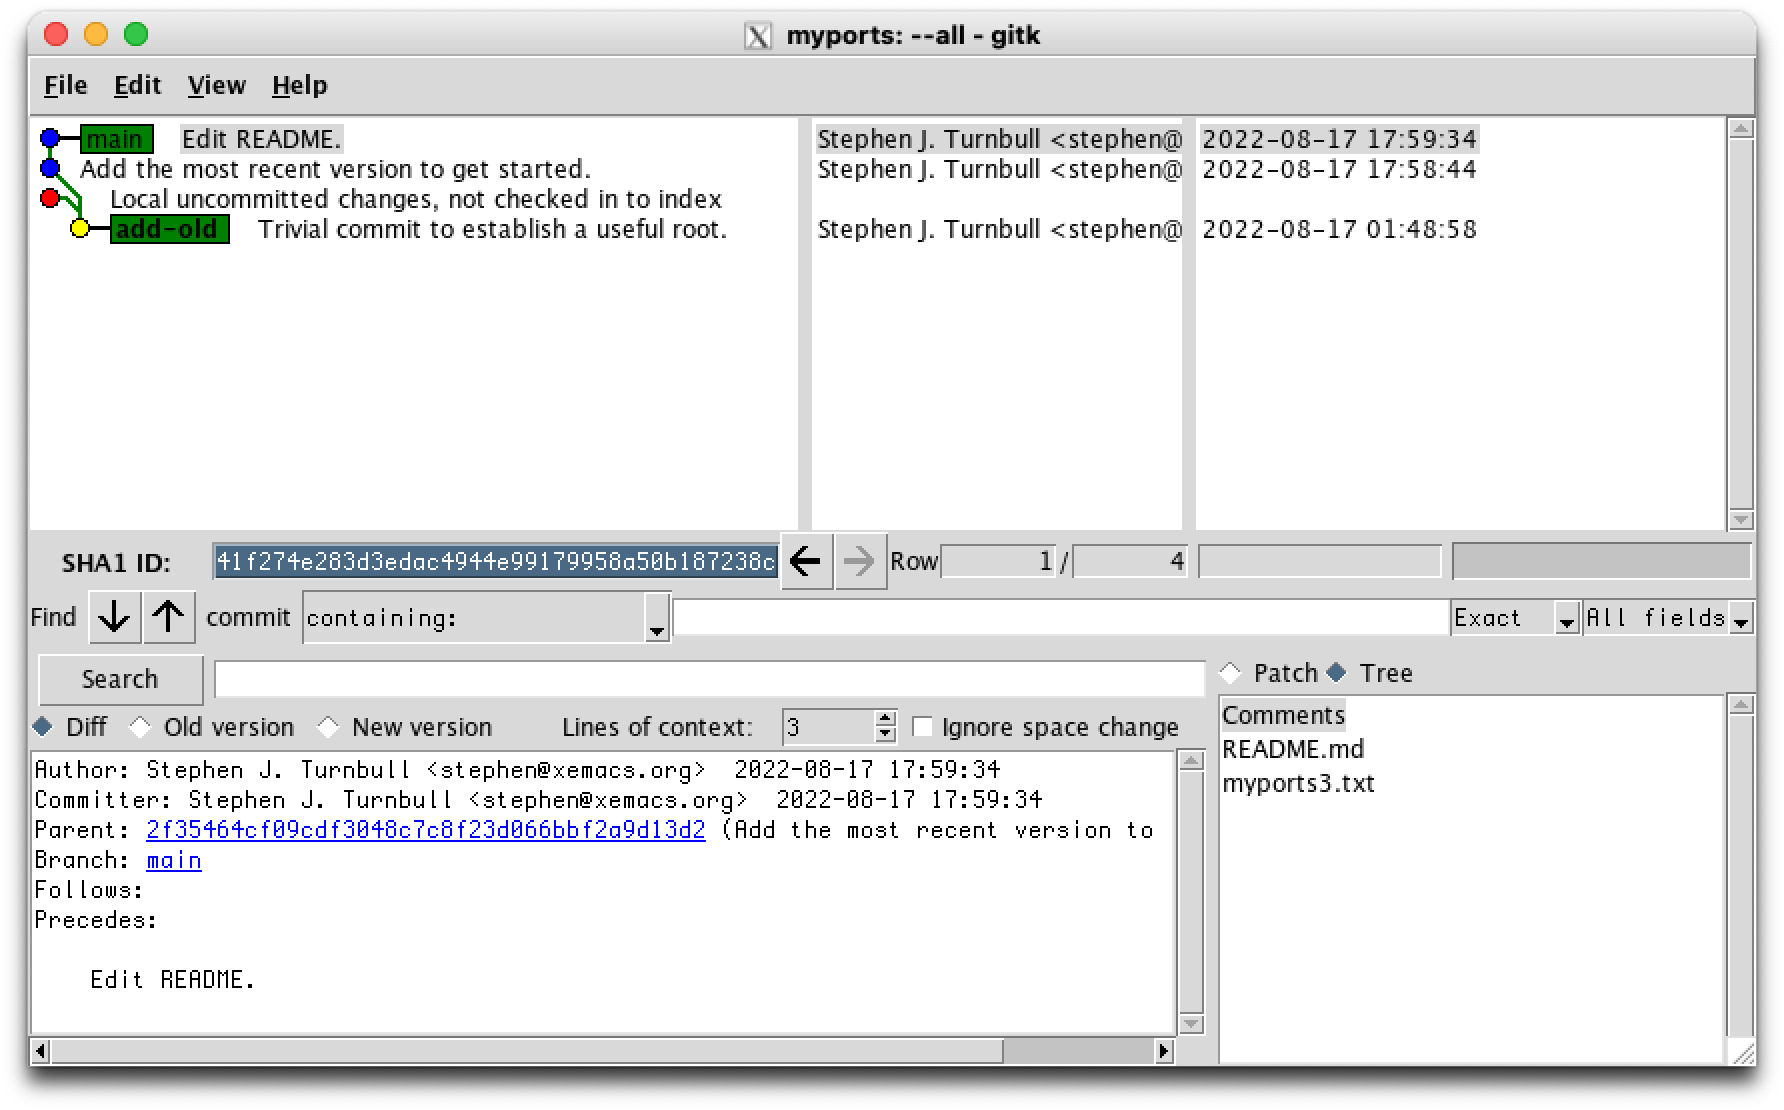
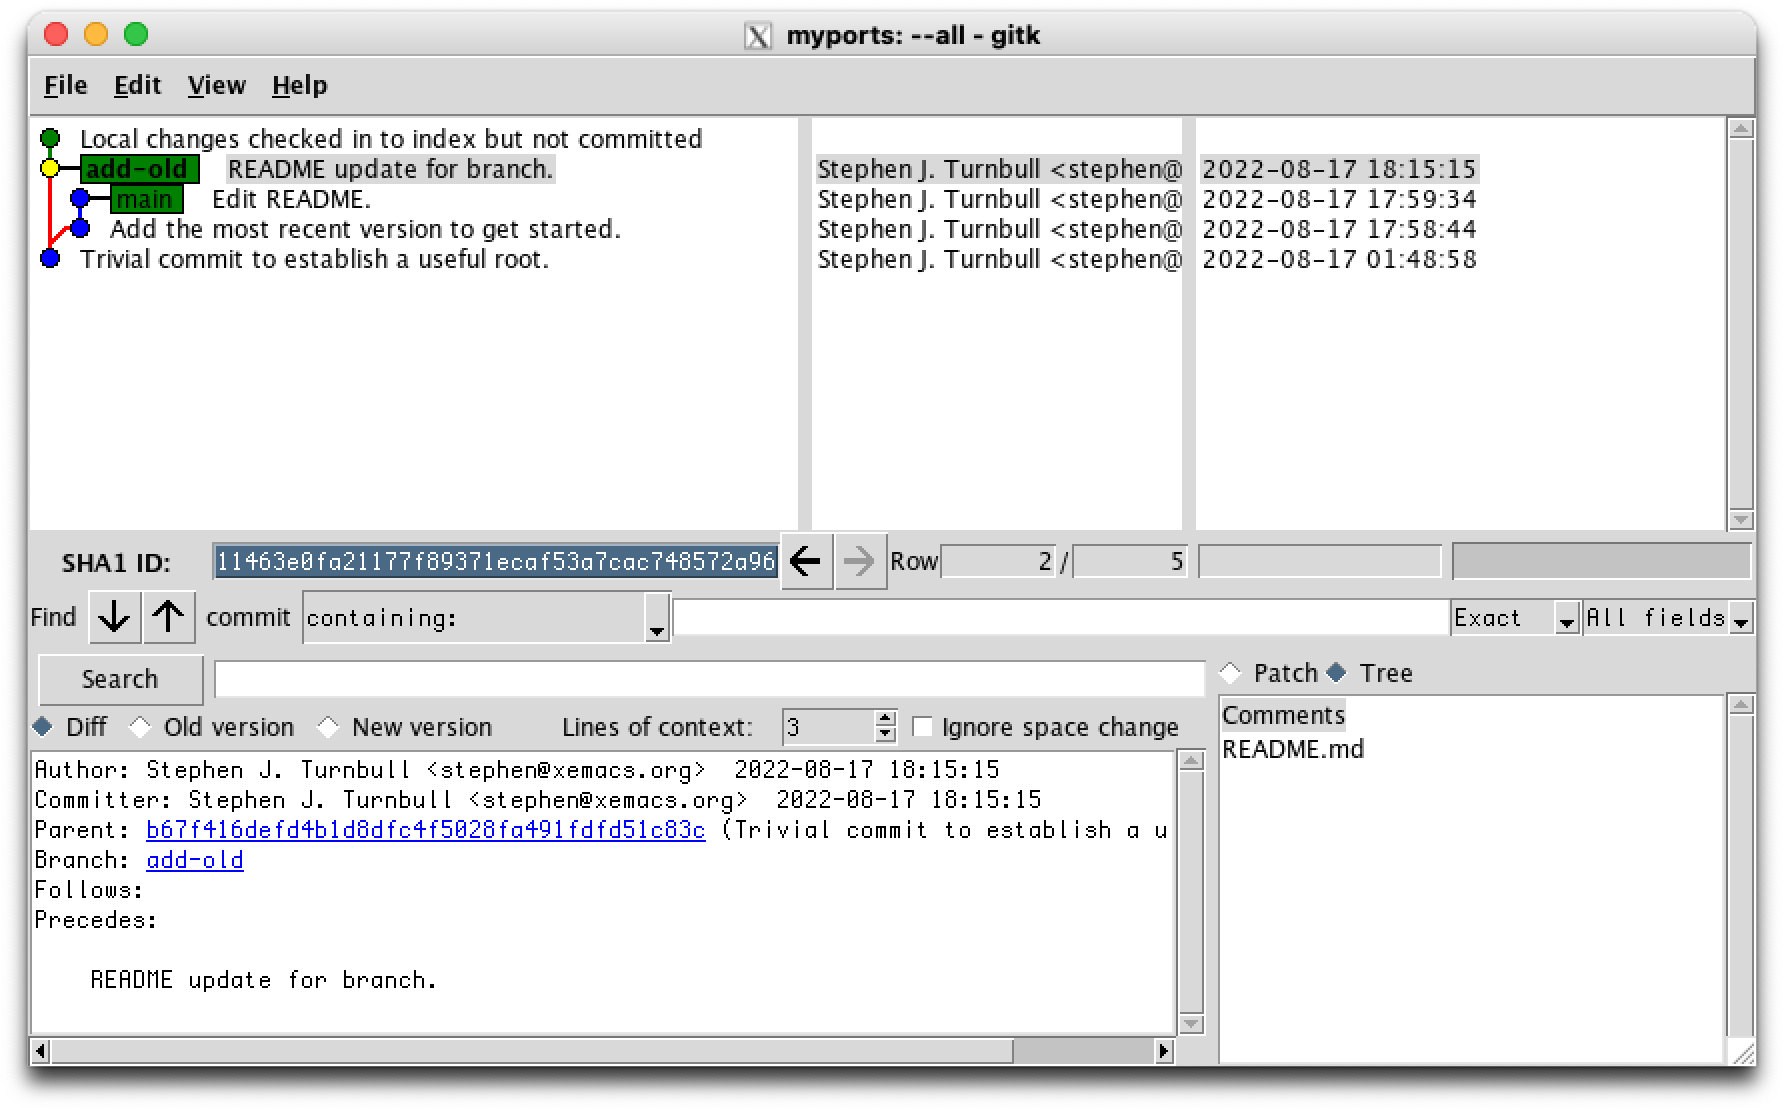
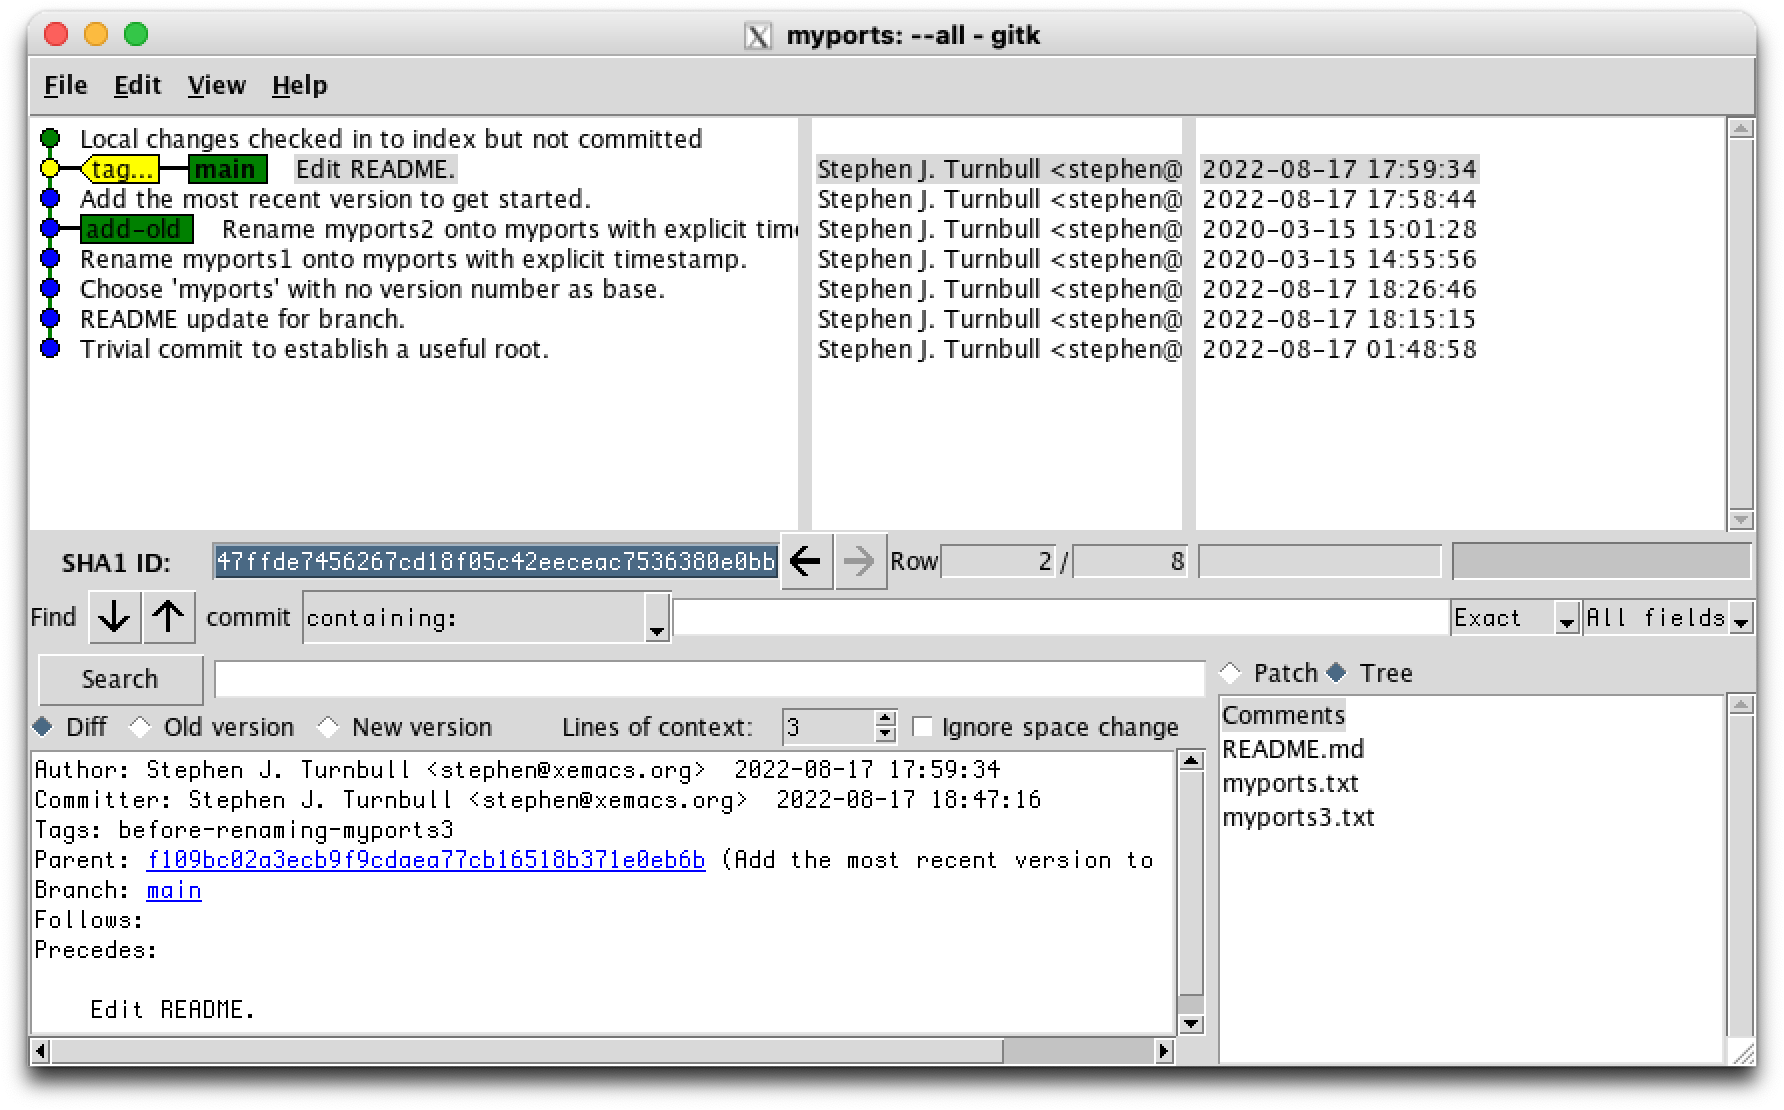
Note that in the screen shot below there is a red node above and to the left of the add-old node. The changes it refers to are not part of the repository yet. It's just a nice feature of gitk that it shows this to you. [1]
Now we commit directly:
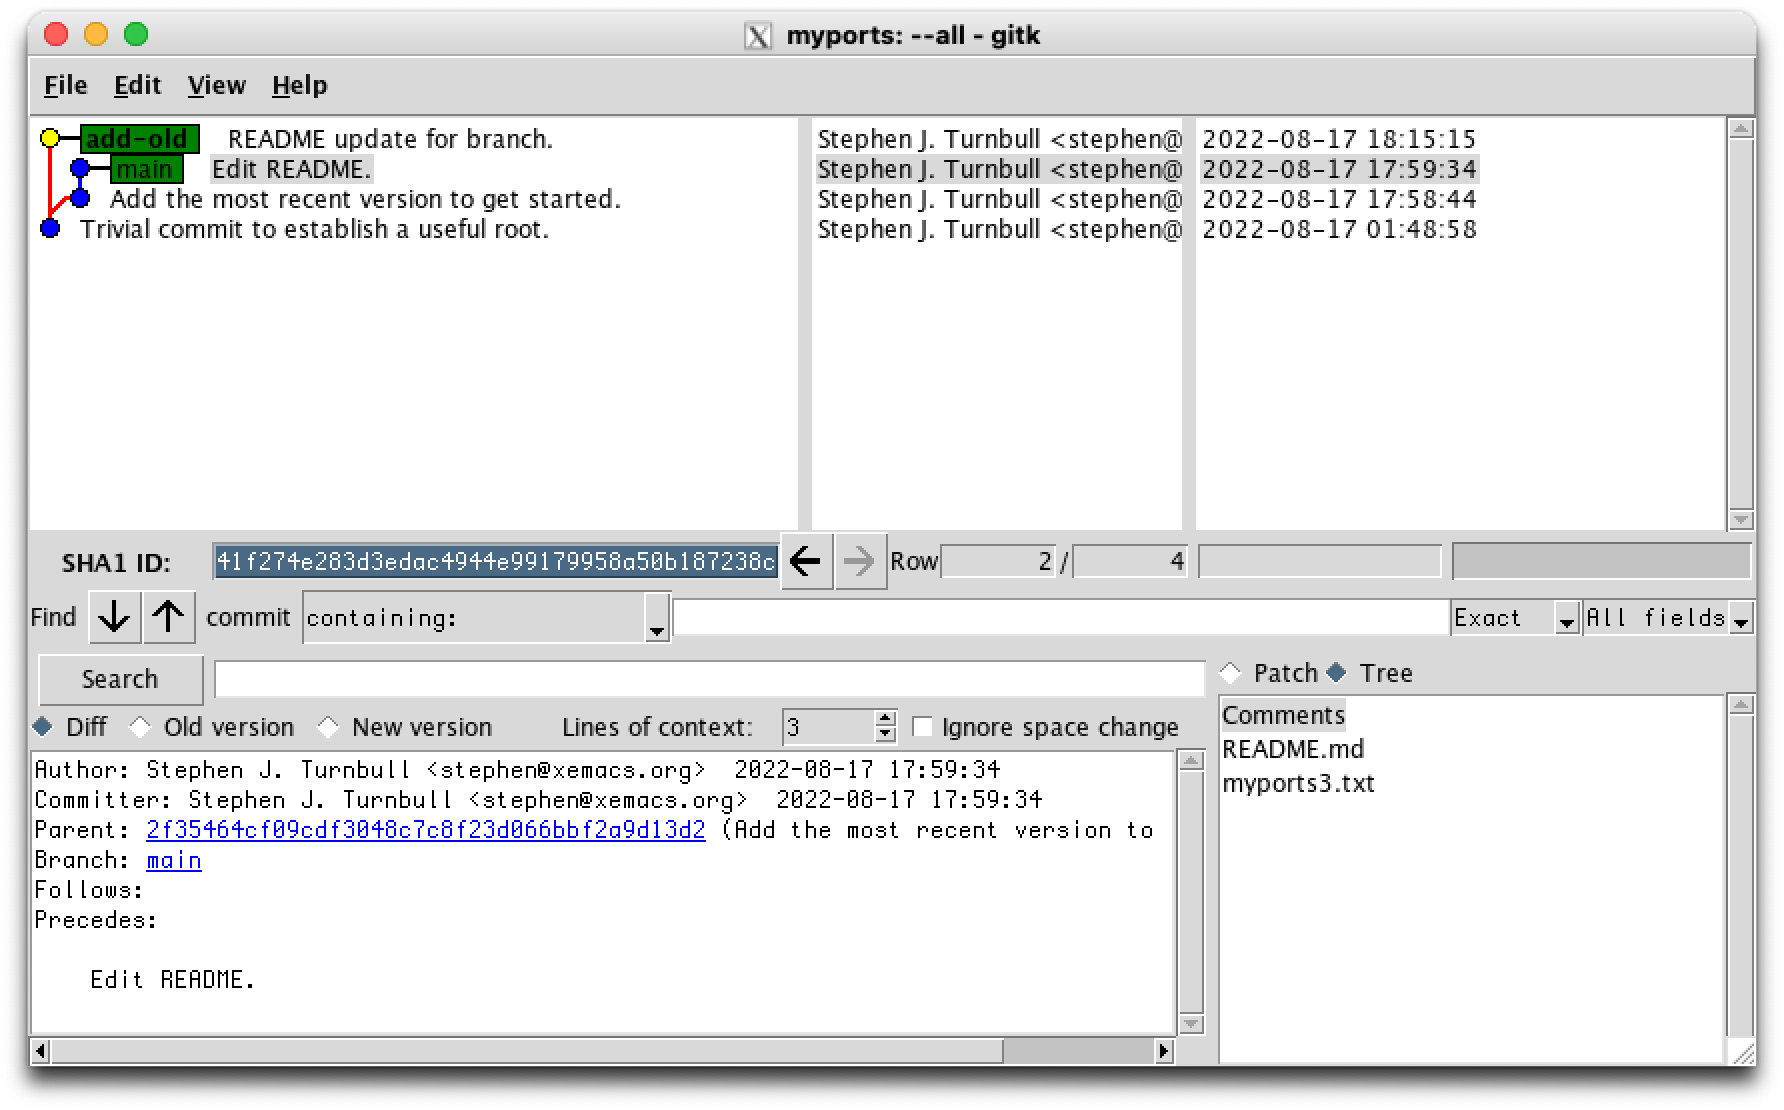
% git commit -m "README update for branch." README.md
[add-old 6c27056] README update for branch.
 1 file changed, 1 insertion(+)
The repo after this commit is displayed below. Quiz: Do you see the differences between the two screen shots? How many did you find? Can you explain why they're different?
Next we add the oldest version, myports.txt. Conveniently it already has the generic name, but if it didn't we could rename it first, then add it:
% git add myports.txt

steve ~/myports 18:15 % ls
README.md   myports.txt     myports1.txt    myports2.txt
Here we see the final variation on nodes, the green node that indicates that git add has made git aware of changes that are ready to be committed, but the operation isn't finished yet.
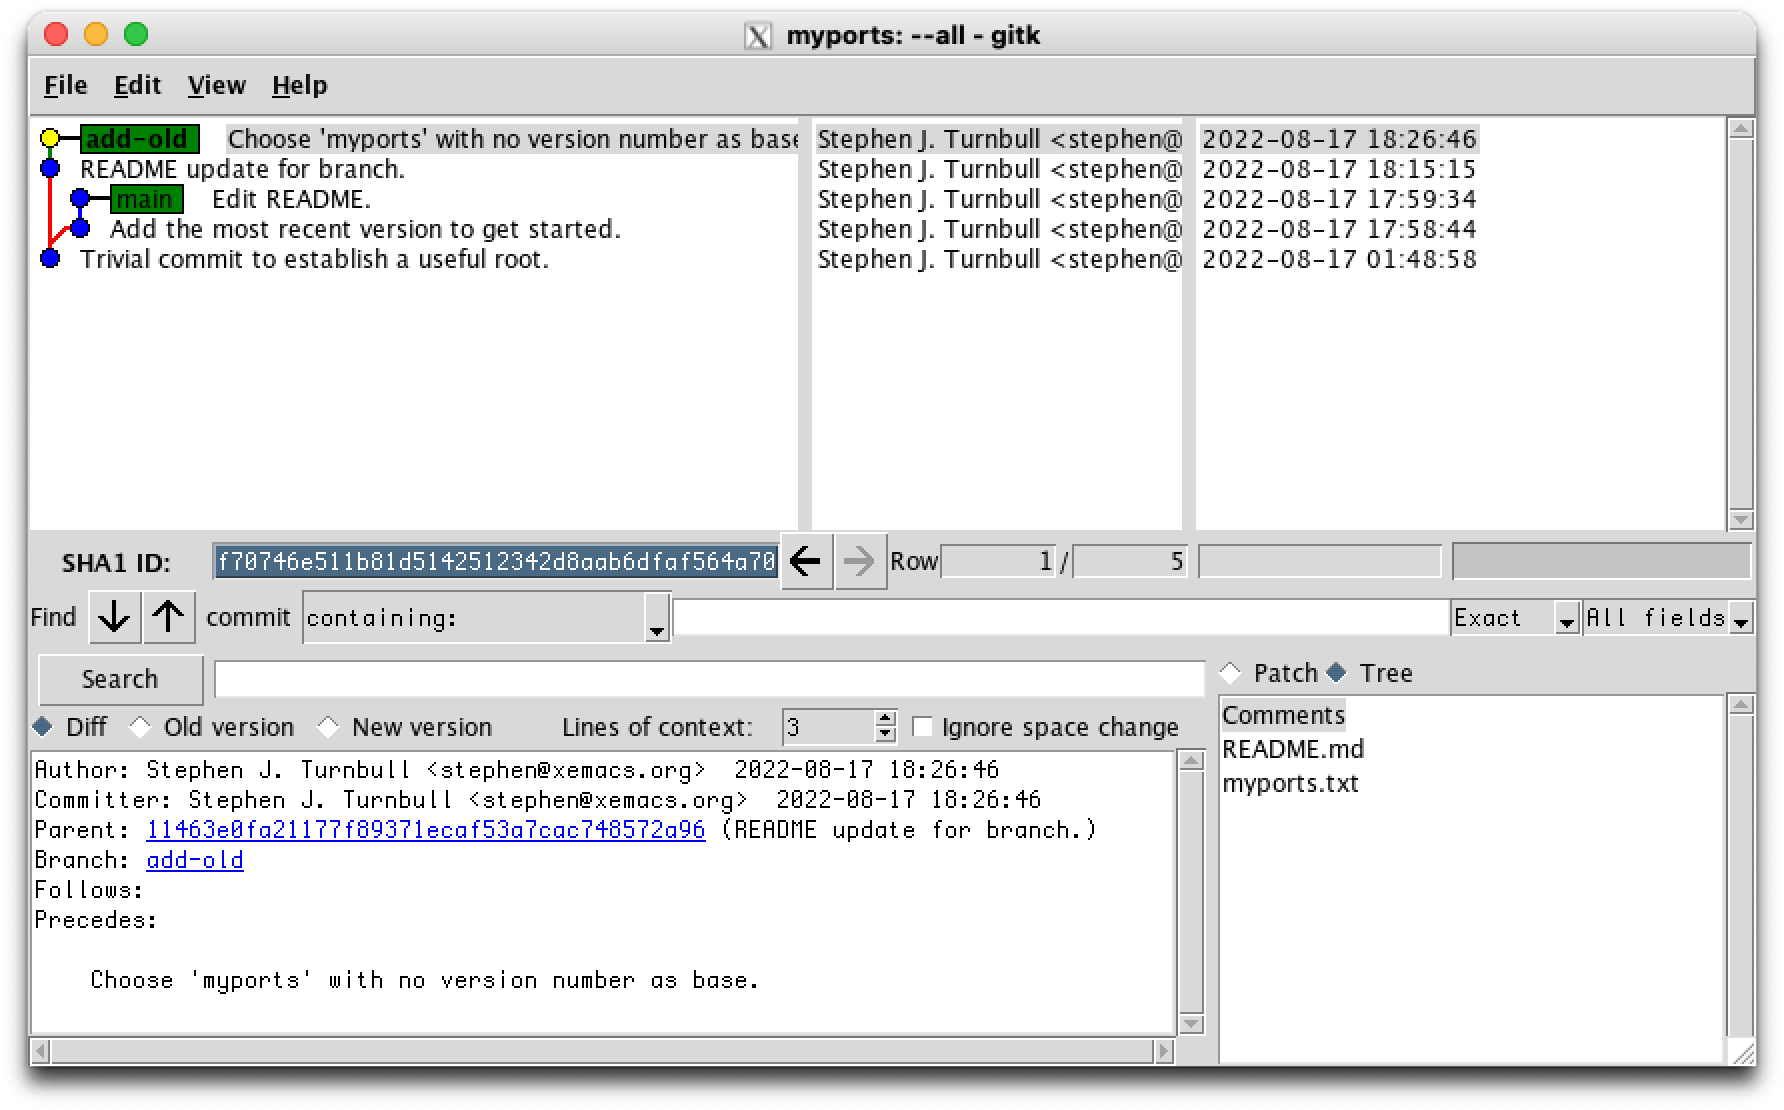
And we commit:
% git commit -m "Choose 'myports' with no version number as generic."
[add-old 50b55bb] Choose 'myports' with no version number as generic.
 1 file changed, 1354 insertions(+)
 create mode 100644 myports.txt

% git status
On branch add-old
Untracked files:
  (use "git add <file>..." to include in what will be committed)
    myports1.txt
    myports2.txt

nothing added to commit but untracked files present (use "git add" to track)

% git ls-files
README.md
myports.txt
Now we come to the next oldest version, myports1.txt. But it has the "wrong" name, that is, it's not the generic name. So we change it. mv is a Unix command that moves a file's metadata (its name, when it was changed, how big it is, and many others) to a folder. If it's to the same folder, it's just a rename.
% mv myports1.txt myports.txt
Next we use a useful trick. It's not entirely necessary, but if you're doing this kind of repo rearrangement on a number of different branches, it helps to keep things in order. First we find out the date and time when the file was saved, and "should" have been committed. I'm using the Unix stat command, but any detailed listing that has the date and time will do.
% stat -t %FT%T -f %Sm myports1.txt
2020-03-15T14:55:56
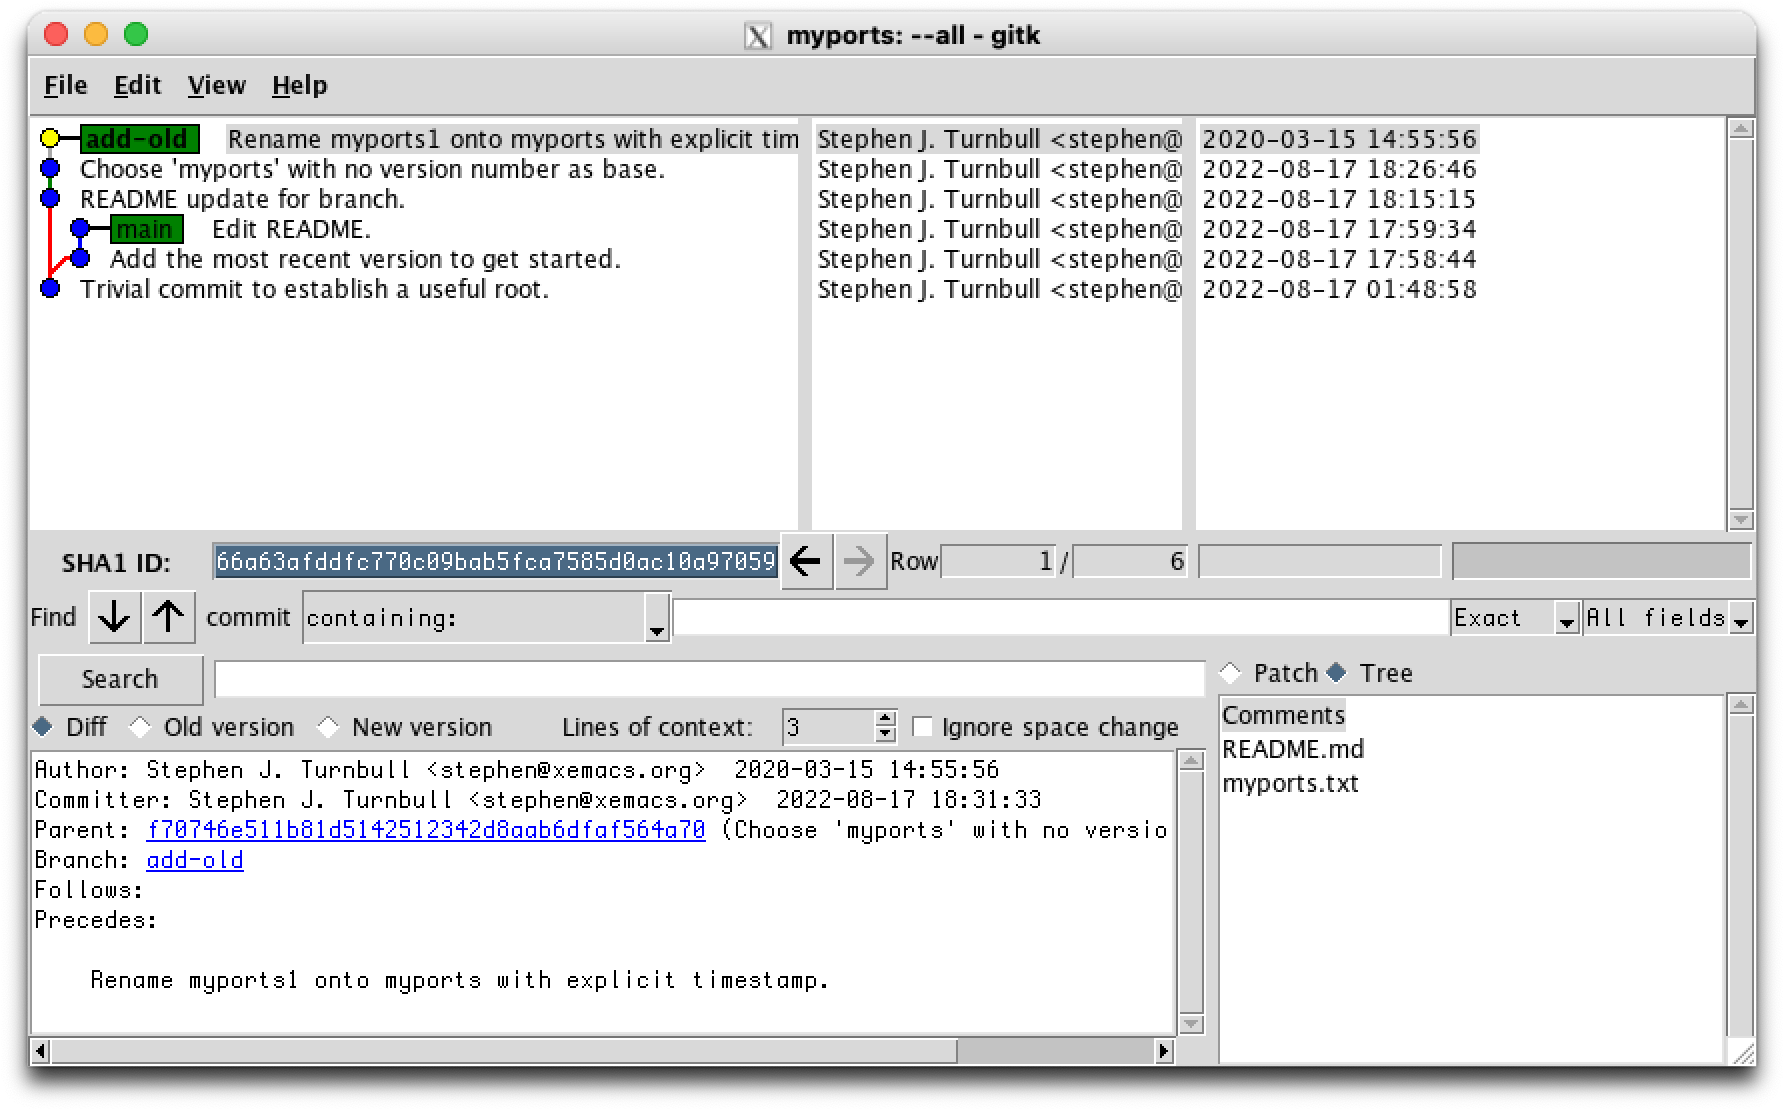
Then we use this date and time in the commit command. Note that even though we copied a completely different file and gave it the name myports.txt, git doesn't care how the file got changed. It's changed and git knows about the name, so we can git commit without doing git add first:
% GIT_AUTHOR_DATE=2020-03-15T14:55:56 git commit -m "Rename myports1 onto myports with explicit timestamp." myports.txt
[add-old 4432248] Rename myports1 onto myports with explicit timestamp.
 1 file changed, 1167 insertions(+), 1354 deletions(-)
Now we do the same dance for myports2.txt:
% mv myports2.txt myports.txt

% stat -t %FT%T -f %Sm myports.txt
2020-03-15T15:01:28

% GIT_AUTHOR_DATE=2020-03-15T15:01:28 git commit -m "Rename myports2 onto myports with explicit timestamp." myports.txt
[add-old 0d640cc] Rename myports2 onto myports with explicit timestamp.
 1 file changed, 1354 insertions(+), 1167 deletions(-)

% ls
README.md   myports.txt
Now we checkout the main branch again:
% git checkout main
Switched to branch 'main'

% ls
README.md   myports3.txt
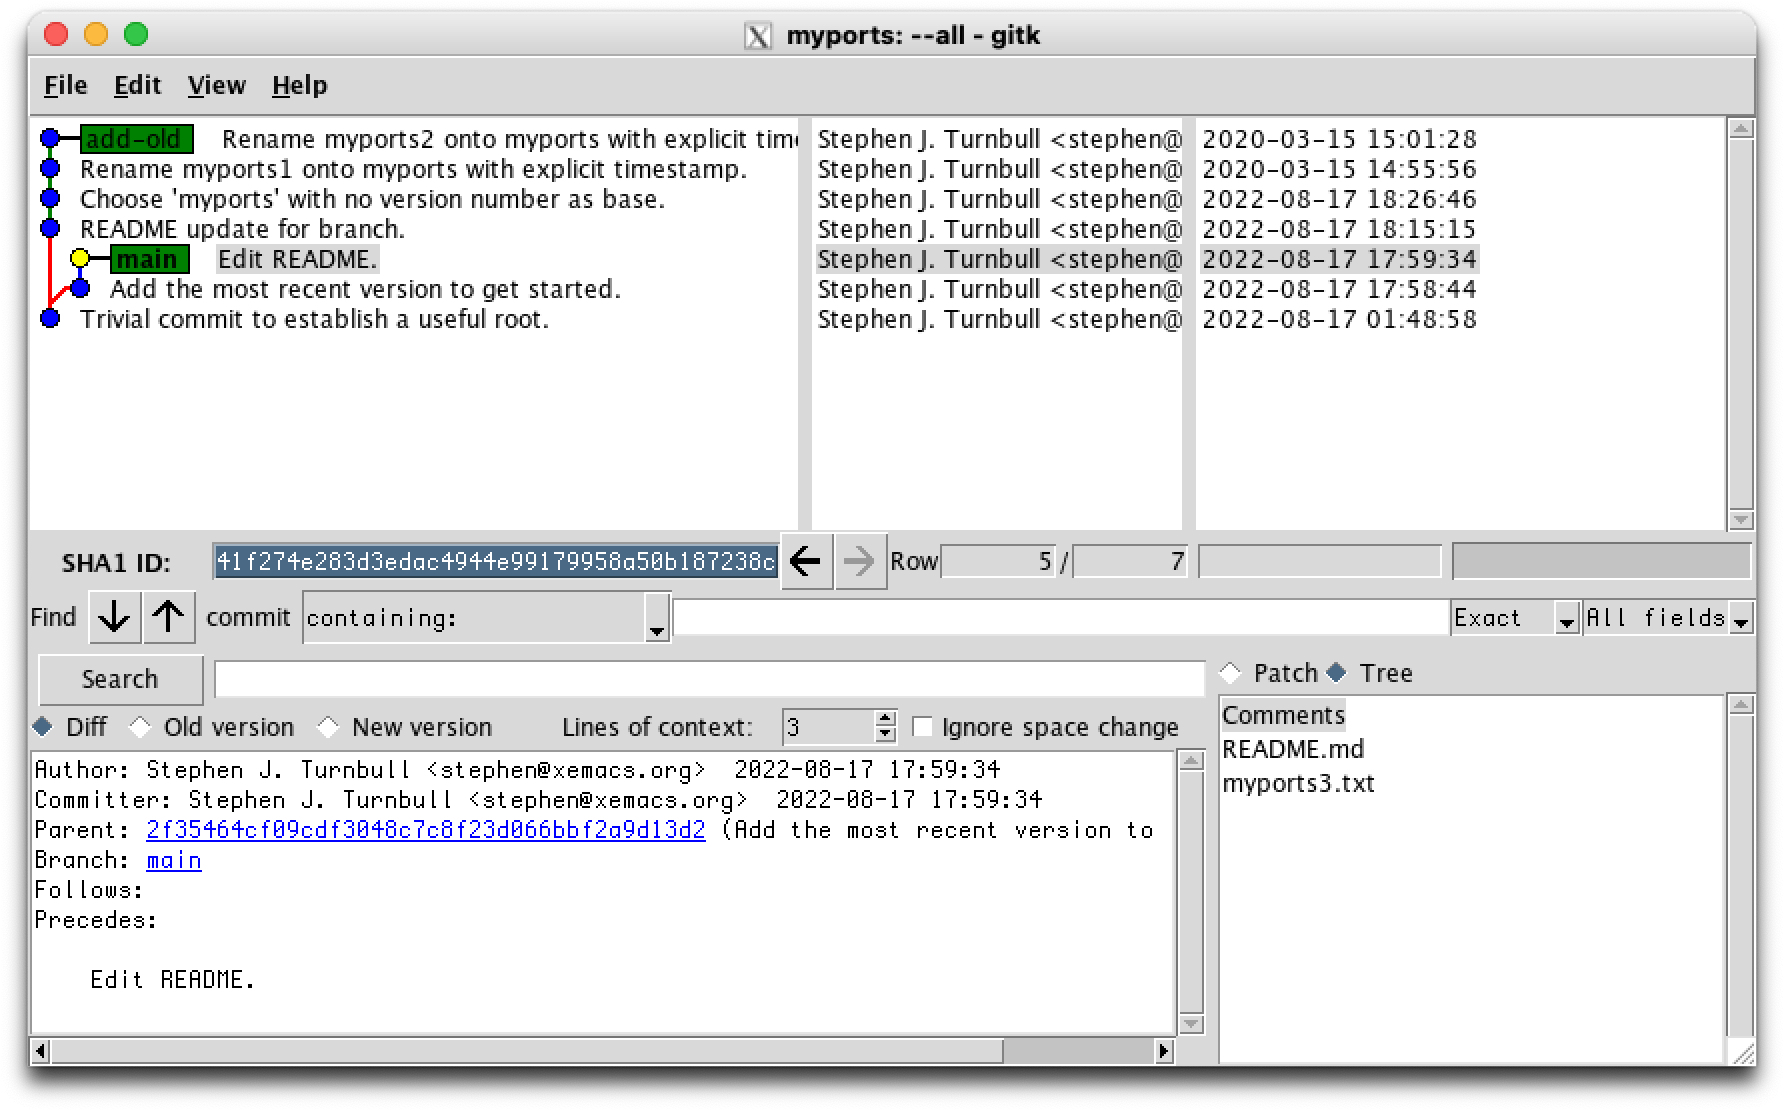
Do you see the differences in the last two screen shots?
We return to the add-old branch:
% git checkout add-old
Switched to branch 'add-old'

% ls
README.md   myports.txt
You see how git manages the different versions. On the main branch, we have myports3.txt, the current version, and on the add-old branch we have the myports.txt, which is the next-to-last version. Now our problem is how do we get both versions on the same branch? We need to merge the two branches. There are several commands whose purpose is to merge branches:
- git merge, for branches we think of as parallel to each other,
- git rebase, when we want to move a whole branch to a different place in the commit graph,
- git pull, which fetches a branch full of commits from another repository and then merges them locally, and
- git push, which uploads a branch full of commits to another repository and then merges them there. [2]
Our strategy, as mentioned above, is to "cut off" the main branch and "graft" it to the tip of the add-old branch. git rebase is quite sophisticated and allows very general specification of where to cut, how many commits to include, and where to graft. But usually you use the simple case we have here.
The basic rebase command [3] looks like this:
git rebase WHERE-TO-GRAFT WHICH-BRANCH-TO-CUT
There's something missing. Do you know what it is? It's "where to cut off the branch". But there's a simple rule that is what you want almost all of the time:
Cut WHICH-BRANCH-TO-CUT so that all commits in WHICH-BRANCH-TO-CUT that are not in the WHERE-TO-GRAFT branch are included.
So we can leave that out. In our example, WHICH-BRANCH-TO-CUT = main and WHERE-TO-GRAFT = add-old. So let's do it!
% git rebase add-old main
Rebasing (1/2)
Rebasing (2/2)
Auto-merging README.md
 CONFLICT (content): Merge conflict in README.md
error: could not apply 07bfafd... Edit README.
hint: Resolve all conflicts manually, mark them as resolved with
hint: "git add/rm <conflicted_files>", then run "git rebase --continue".
hint: You can instead skip this commit: run "git rebase --skip".
hint: To abort and get back to the state before "git rebase", run "git rebase --abort".
Could not apply 07bfafd... Edit README.
Oops, that looks scary. Don't panic! It's quite normal. First, notice that it says Rebasing (1/2) and then goes on to Rebasing (2/2) without saying anything more about number 1 of 2. In Unix, "no news is good news". If the command doesn't complain that something went wrong, it's a complete success. [4] Look at this screen shot:

That's odd! There is a new node above the node attached to the add-old branch ref, and it's yellow. Do you know what that means? Think about it for a minute.
Because it's yellow, it is the active HEAD (head of the checked-out branch). To be HEAD, it must be a commit. So git rebase has already committed the change labeled "Add the most recent version to get started."
Something else is odd: that commit exists in two places! [5] (Find them.) Why is that? It's easy to delete or move refs with git, but git never deletes repository content. [6] Here "content" means blobs (containers for file contents), trees (listings of folder contents), commits, notes (you don't need this) and signed tags (you don't need this either). You can do all kinds of tricky things which make commits (and their related content) seem to disappear, but they're still there in the repository until you tell git to throw them out.
Using git means never having to say "What did I just do?! All my work is gone!" Even a git novice can protect themselves, and if you forget a power user can probably still get anything you committed back for you, even if it's invisible now. The rules are simple:
- Commit early, commit often. [7]
- Write good log messages. This means writing something that will make you remember why this commit is important if it is, or that it's not important if that's the case.
- Protect any commit which records something you worked hard to achieve with a tag (or sometimes a branch). Tags should have names that make you remember why you added them.
- Don't touch anything in the .git folder.
OK, so let's take a look at that scary CONFLICT. The message says that the problem is in README.md, so let's look at it.
steve ~/myports 18:38 % cat README.md
This is a meaningless README so I can make a root commit.
<<<<<<< HEAD
Now let's make a branch to clean up old versions in order.
Show GIT_AUTHOR_DATE format.
2022-08-17T17:54:01
=======
Edit the README to add history.
>>>>>>> 41f274e (Edit README.)
The symbols that look like tire tracks from a truck that ran over your file are conflict markers added by git. There may be many such conflict stanzas that run from the <<<<<<< line to the >>>>>>> line. Those two conflict markers are labeled with the commits that are in conflict. The ones on top come from WHERE-TO-GRAFT and the ones on the bottom from WHICH-BRANCH-TO-CUT. Sometimes you need a little of this and a little of that, and you have to think about it and edit carefully. Sometimes you choose all of one and none of the other.
In this case, we're going to take both, in the order given. Why? That's the time order that corresponds to the branches. "This is a meaningless README" comes from the original "root" commit. Then "Now let's make a branch" was added in the first commit to the add-old branch. Although "Edit the README" was added before "Now let's make a branch" in terms of the time on your wristwatch, in terms of "branch time" it goes with mytext3.txt, which comes after all the other mytext versions, which come after "Now let's make a branch".
So we edit the file, just removing the conflict markers:
% nano README.md

% cat README.md
This is a meaningless README so I can make a root commit.
Now let's make a branch to clean up old versions in order.
Show GIT_AUTHOR_DATE format.
2022-08-17T17:54:01
Edit the README to add history.
Now we git add. The reason is that we're still in the middle of the rebase! We want git rebase to clean up any remaining mess in the metadata, and commit the changes. We need a way to tell git rebase that README.md has been repaired and is ready for commit. git add is the way we mark a file as "ready for commit" in other cases, so git uses it the same way here.
% git add README.md

% git status
interactive rebase in progress; onto 0d640cc
Last commands done (2 commands done):
   pick 9a863db Add the most recent version to get started.
   pick 07bfafd Edit README.
No commands remaining.
You are currently rebasing branch 'main' on '0d640cc'.
  (all conflicts fixed: run "git rebase --continue")

Changes to be committed:
  (use "git restore --staged <file>..." to unstage)
    modified:   README.md
OK, git thinks we're ready. So we use the --continue option. The part about GIT_EDITOR is because the default editor that git likes to use is vi, a editor with long history on Unix that many programmers love, but it's not easy to pick up in the middle of a stressful rebase. nano is easy to use with the arrow keys for motion. You can change the default with git config --global core.editor nano. If you're using an IDE like PyCharm, it will usually handle this for you.
% GIT_EDITOR=nano git rebase --continue
hint: Waiting for your editor to close the file...
[detached HEAD d2d93c9] Edit README.
 1 file changed, 1 insertion(+)

Successfully rebased and updated refs/heads/main.

We're not quite done yet:
% ls
README.md   myports.txt     myports3.txt
This seems like a good place to introduce git tag. We've done all this work, let's make sure we don't accidentally mess up in a way that's difficult to recover. We can't stop ourselves from making mistakes, everybody makes mistakes. We can make it easy to recover:
% git tag before-renaming-myports3
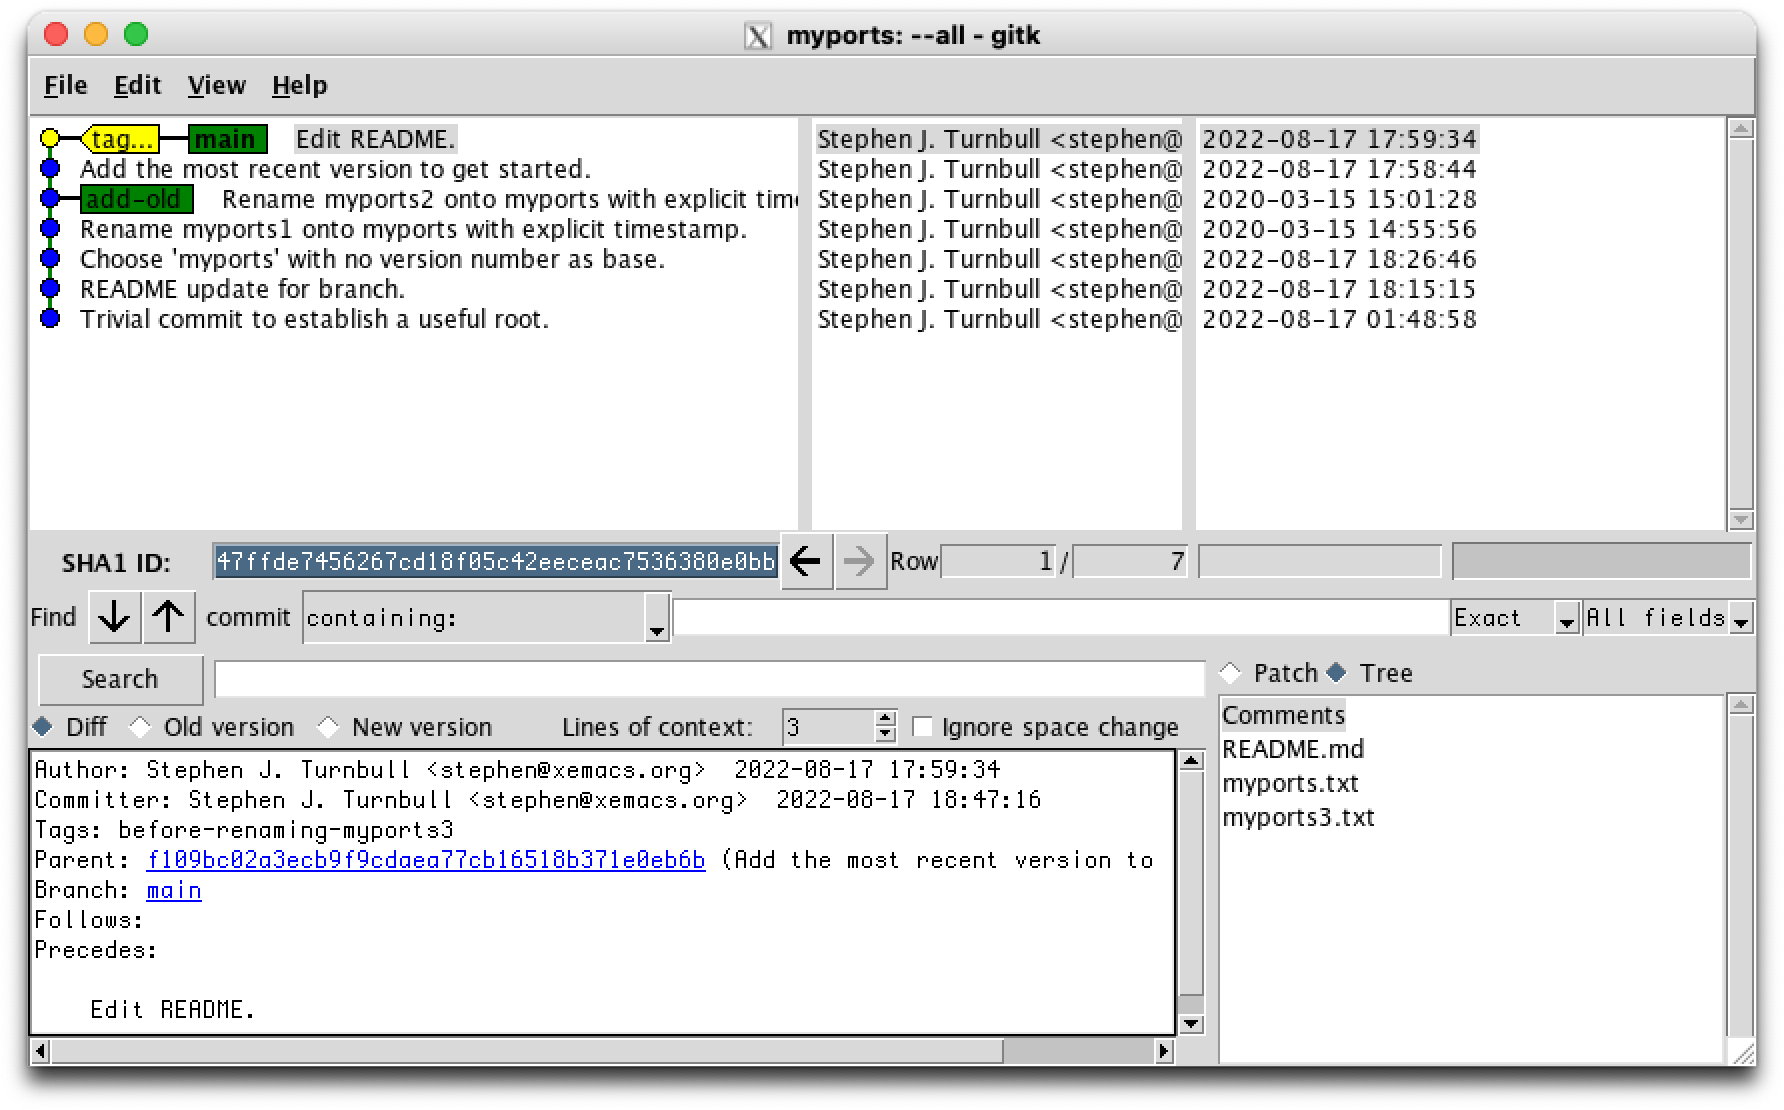
Now if renaming myports3.txt to myports.txt messes everything up, we can get back to exactly this state with git checkout before-renaming-myports3. [8]
Now let's actually rename myports3.txt to make it the current version of myports.txt. We'll use git this time because both files are being tracked, and git will handle the adding and removing for us. The -f ("f" for "force") option is needed because git normally will not overwrite an existing file, but that's exactly what we want here.
steve ~/myports 19:01 % git mv -f myports3.txt myports.txt
%

steve ~/myports 18:59 % git status
On branch main
Changes to be committed:
  (use "git restore --staged <file>..." to unstage)
    modified:   myports.txt
    deleted:    myports3.txt

steve ~/myports 19:00 % git ls-files
README.md
myports.txt
And now we can commit the renamed current version as myports.txt:
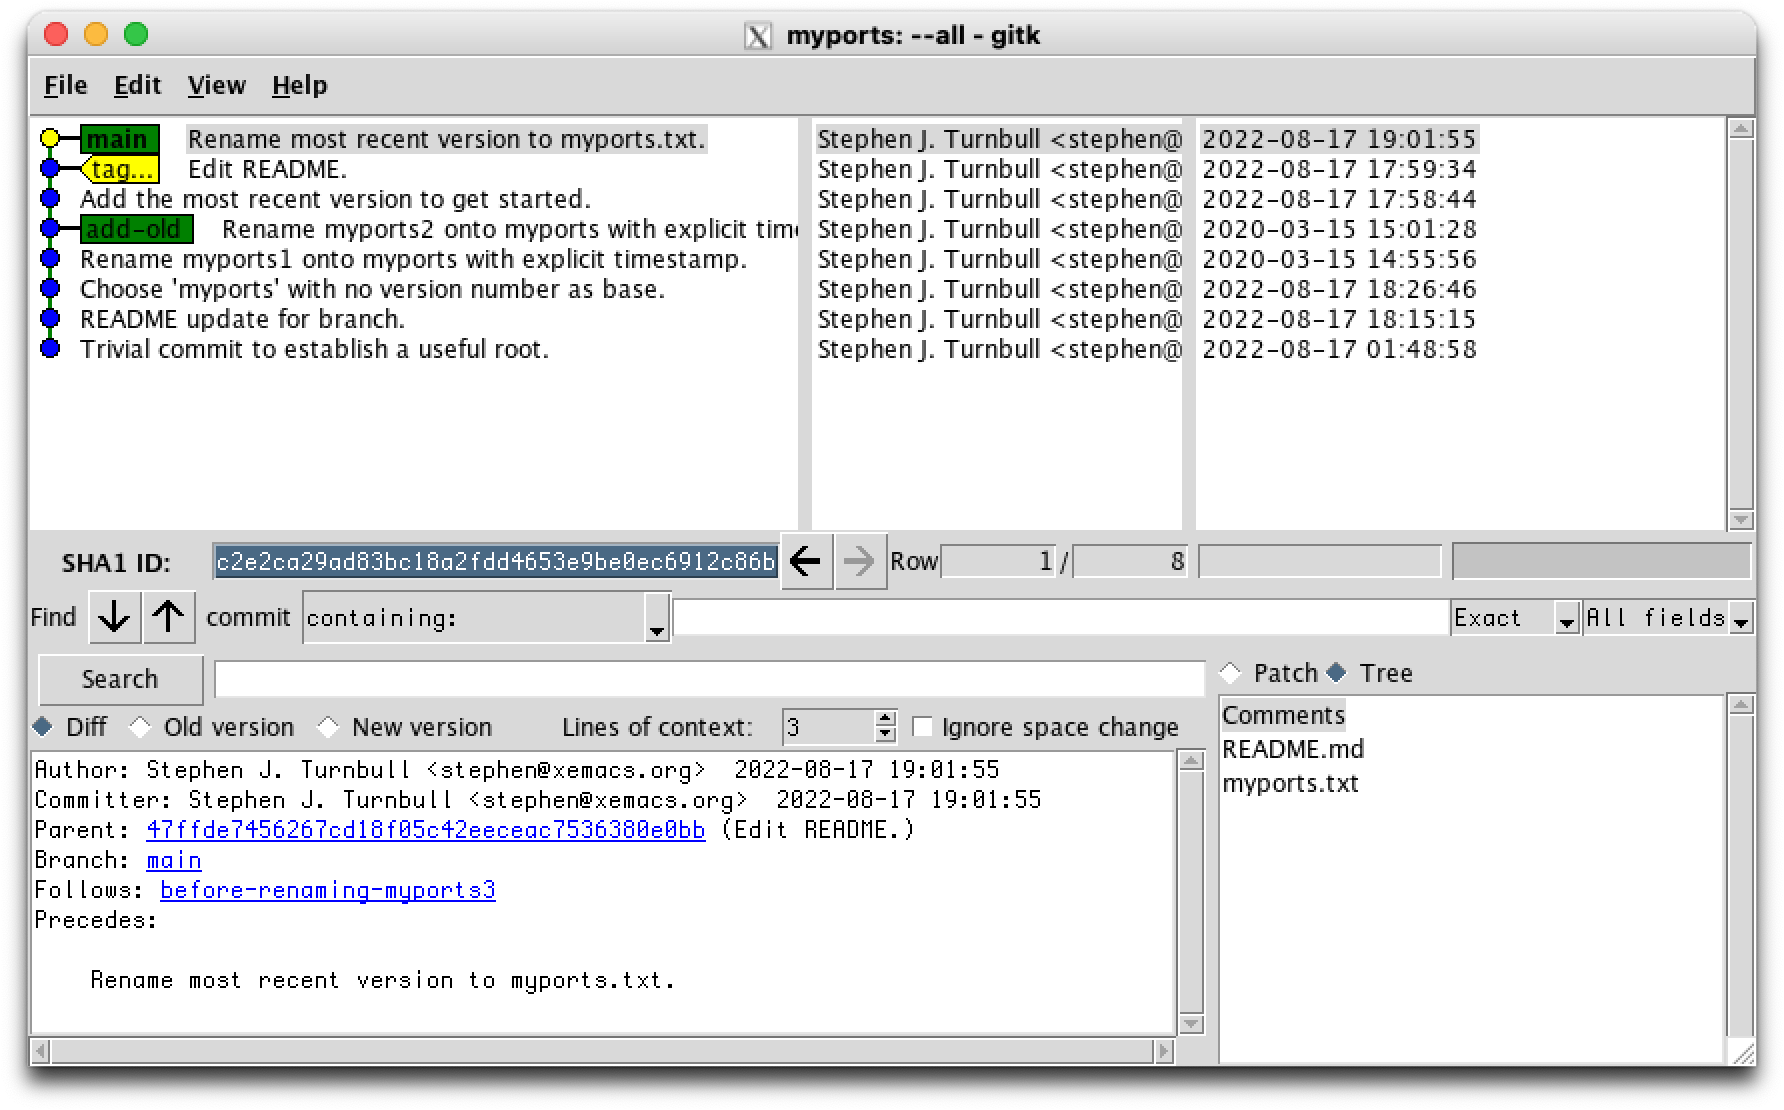
steve ~/myports 19:01 % git commit -m "Rename most recent version to myports.txt."
[main c2e2ca2] Rename most recent version to myports.txt.
 2 files changed, 237 insertions(+), 1591 deletions(-)
 delete mode 100644 myports3.txt

% git status
On branch main
nothing to commit, working tree clean

%
Once we're sure that we don't need to revert to the previous situation, we can delete the tag with
git tag -d before-renaming-myports3
Footnotes
| [1] | If it happens that the current version has exactly the generic name you want to use, there are complications when you get to the git rebase stage described below. Ask me for help. |
| [2] | A not-so-nice feature is that you have to use F5 to refresh gitk to see any changes. |
| [3] | git push normally has a lot of restrictions on it, so that it doesn't "feel" like a "real" merge. But it really is. |
| [4] | In fact, there's an even simpler version: git rebase WHERE-TO-GRAFT in which WHICH-BRANCH-TO-CUT is taken to be the current branch. So if after checking out main above, we did not return to add-old, we could have gotten exactly the same outcome (including the conflict) with git rebase add-old |
| [5] | As far as the command itself can tell. If there's a bug, the command may think all went well, but in fact something broke. That's the bug's fault, not the command's. |
| [6] | They're not actually the same commit, but this is a very deep idea in computer science. It's reasonable to think of them as being the same commit in two different places for now. |
| [7] | It's possible to ask git to do so, but you have to use special commands, and normally git will only delete content that is "old enough". You can even force git to delete more recent content, but that takes a fair amount of effort. |
| [8] | If you're worried about branch clutter visible in gitk or git log listings, there are ways to make excess commits invisible. If you're worried about disk space, just don't. Commits and trees are very small, and file contents can be made very compact. By the time you have enough stuff committed to a git repository for this to matter, you'll know how to deal with it (or be rich enough to buy a bigger disk!) |
| [9] | More likely would be git reset --hard main before-renaming-myports3. |